Skip to content

Life Hack and DIY Lifestyle

  • Things I like
  • Life Hacks
  • DIY projects
  • Home Improvement Basics
  • About Me
  • Resources
  • Lego
  • 3D Printing

Author: admin

Lego Office Tower

December 19, 2020December 20, 2020 admin

I built this Lego office tower with the help of my kids. It is about 6 ft 6 inches tall. We built the lower levels to be a solid color, but it became hard to find bricks so the higher level are a mix-match of colors. We add lego mini-figures to each level as well.

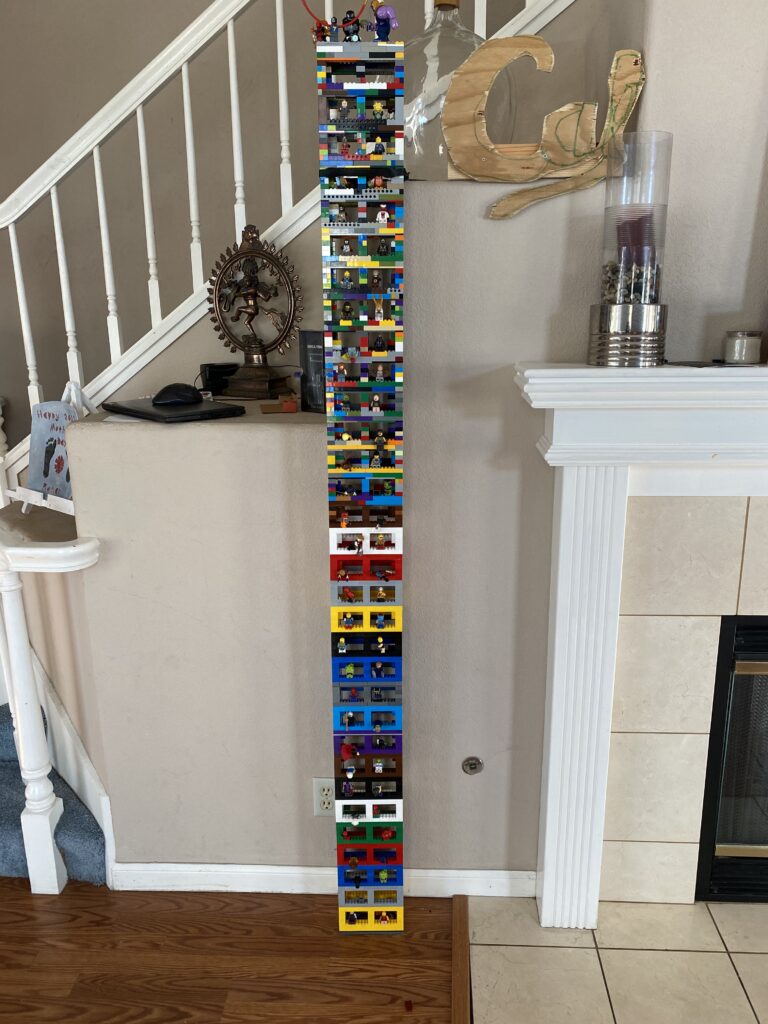
Overall this was really fun to make! The following video provides more details.

Posted in Lego

Building a wooden sword

November 26, 2020November 29, 2020 admin

For this project I built two wooden swords for my kids to play with. They turned out pretty well, see picture below.

The steps to build the sword were pretty simple.

  1. First I cut a square pole to the length I wanted (which in this case was 110 centimeters).
  2. Then I cut out two pieces to serve as the bell guard. I connected these pieces using a L bracket, with one screw going into the sword and the other going into the bell guard.
  3. Next I added an additional piece which was screwed into both bell guard pieces to keep them in place.
  4. Next I sanded the blade part and the handle of the sword to avoid splinters.
  5. Lastly I bought tennis racket grip and used that to cover the handle so that the handle was more comfortable and also to avoid splinters.

And that’s it, with these steps your wooden sword will be complete.

Then following video was more details on how to make the wooden sword.

Posted in DIY projects

Mahogany Frame

November 17, 2020November 29, 2020 admin

In this post I talk about a mahogany frame I made for some art I made a long time ago. The art is canvases I spray painted, which dried in a form which made them look pretty cool.

Construction of the frame was pretty simple. I cut four mahogany boards to go around the canvases. Then I added three boards on the back to give it structure: one on top, one on the bottom and one in the middle. These boards are bolted to mahogany boards to be kept in place, you will see the black bolt tops in the picture. To hold the canvases in place I used velcro.

There are more details in the following video which explain how the frame works better:

Posted in DIY projects

Angled raised bed

October 31, 2020October 31, 2020 admin

This project was pretty simple, I made a raised bed for our front yard. The raised bed had an angle at the top which made it a little more complicated. It turned out pretty well, this is how it looks:

The construction was pretty simple, basically just making a box. Two parts were a little complicated:

  1. Attaching the boards to each other
  2. Creating the angle section

To attach the boards to each other I put a 2 x 4 behind the ends of the two boards and held them in place with bolts. A similar process was used for the corner pieces but that required using a 1 x 1 piece.

Making the angle section was more complicated. Cutting the board at the correct angle was difficult, as I only had a mitre saw and circular saw. I ended up cutting the angles by hand, but it did not end up straight. Later I figured out I could have angled the circular saw, which would have made it easier to make the cuts. I used gap filler pieces to make the angle part flush. Afterwards I bought a jigsaw which would have made cutting the angles much easier.

Overall I am pretty happy with how it turned out. You can see more details in the following video:

Posted in DIY projects

Things I like – Various Species of Wood

September 27, 2020October 31, 2020 admin

I have been getting more into making trivets and in my latest project with them I bought a lot of species of wood to give the trivets more variety.

I thought it was interesting how different the woods looked (eight species in total), see picture below. Most of this wood is too expensive to use for projects outside of decorative projects.

In case you can’t read my writing, the eight types of wood were:

  1. Alder
  2. Birch
  3. Poplar
  4. Walnut
  5. Mahogany
  6. Red Oak
  7. Maple
  8. Cherry

I go into more detail in the following video:

Posted in Things I like

DIY Project – More Trivets

September 15, 2020September 15, 2020 admin

This is pretty simple, it builds upon my previous post about making trivets which can be found here.

The process to make the trivets was simple.

  1. Cut rectangle pieces of wood, all the same size.
  2. Glue the pieces together overnight (using wood glue), holding them with clamps so the seal is strong.
  3. Sand the trivets to remove any rough spots.
  4. Stain the trivets (optional)

I made them the same way I did previously, but tried some different types of wood. When you make multiple versions at once assembly line style the process becomes pretty quick, I would say it took about 20 minutes per trivet.

The first set was made out of pine, oak and poplar (poplar is the middle board). You can see how these look here:

The second set was made out of pine and oak, similar to the one I made before. This is how those looked.

Posted in DIY projects, Uncategorized

DIY Project – Serving Tray Frame

September 4, 2020September 6, 2020 admin

In this DIY project I build a frame for a serving tray. The previous frame broke and my wife had a sentimental attachment to the serving tray so I built a new one. This is how the final project looked:

Overall I am pretty happy with how it turned out. The project is pretty simple, you just make a rectangle and screw it together. I had to add some additional boards on the ends put that is because I measured wrong.

I cut a groove in one of the boards to slide the tray into, but it was really difficult to make the groove straight so I gave up on this as a method for holding the tray in place. To hold the tray in place I attached four small boards (two on each side) to the side of the frame.

I was really happy with how the stain on the frame came out. This is the most even I have had a stain come out in a long time. I used pre-stain / wood conditioner before applying the stain and this made the stain come out much more even. I am going to continue to use pre-stain going forward.

Here is a video summarizing the project:

Posted in DIY projects

DIY Project – Building a sturdy stool

August 15, 2020August 31, 2020 admin

For this project I built a stool for my front porch. I didn’t have any seating in my front yard since I moved the bench off my porch to inside my house to serve as a workout bench. Therefore I decided to make another stool, which could also serve as a chair. I made it the proper height so that you could sit on it comfortably. I didn’t build a chair on its own as the one chair I built didn’t turn out that well as I didn’t arch the backrest. Either way, I prefer stools to chairs since they are more versatile and so much easier to make.

The stool came out pretty well, see pictures below:

Building the stool was pretty simple and consisted of the following steps. Note that before I added any wood pieces I sanded them down first, as it was easier to sand them at that point then after they were connected to the project.

Step 1: Cut the stool top to size. The first thing I did was cut the piece that was going to serve as the top of the stool. This piece was a rectangle measuring 19 inches by 21 inches.

Step 2: Attach the leg anchors. I am not sure what else to call these, I cut two pieces of 1 by 1 to match the length of the stool top. Then I drilled two holes in each 1 by 1 and used a nut and bolt to secure them to the stool top. Note that I counter sinked the holes on the stool top so that the bolts would be flush or beneath the wood so you wouldn’t feel them when sitting on the stool top. These leg anchors are the only things connected to the stool top, all the other pieces (legs and support pieces) connect to the leg anchors and not the stool top.

Step 3: Attach the legs. The legs were just 2 x 4s which I cut to length. Then I positioned the legs to support the table top but attached them to the leg anchors with two screws per leg.

Step 4: Attach the cross supports. To make the stool more stable I added cross supports on the sides of the stool without the leg anchors. These were made out of 2 x 4’s. The cross supports prevented the legs from leaning or the stool otherwise becoming unstable. I also added an additional cross support across the middle of the top board, which you can see from the photo above of the stool upside down. This board was added to support the top of the stool so that it wouldn’t crack or bend if a lot of weight was put on the stool.

Step 5: Paint or stain the stool (Optional): Since the stool was going to be outside I wanted to protect the wood so I decided to paint it. Painting is the thing I like the least when building something out of wood but it is a necessary evil. The paint I used had separated as it was watery at the top, requiring me to get creative to mix the paint well, see more details on how I did this here.

That’s it, the steps to make this stool are pretty simple. It has come in really handy, and due to the thick legs and support beams it is very stable.

See more details on the stool and how to build it in this video:

Posted in DIY projects

DIY Project: Making a trivet out of pine and oak

August 9, 2020August 15, 2020 admin

For this project I made a trivet out of pine and oak wood. A trivet is a small plate or board placed under a hot serving dish to protect a table or surface. This is how it turned out:

The process to make the trivet was easy. I cut three pieces of pine wood and two pieces of oak wood, all the same size. Then I glued them together overnight, holding them with three different clamps. After that I sanded it to remove any rough spots. I was going to stain it but my wife told me not do so I did not.

The whole project only took 10-20 minutes of work. It was really easy and I was really happy with how it turned out. See more details in the following video:

Posted in DIY projects

Life Hack – Stirring paint the easy way

August 5, 2020August 5, 2020 admin

This is an easy life hack for when you need to stir paint and using a paint stirring stick is not enough. To solve this problem you can attach a blender attachment (egg beater) or a similar tool to your power drill and use this to stir the paint. They actually make tools specifically for this purpose as shown in the picture below.

This is a paint stirrer (for power drills) which I found on Amazon for $7.

The situation I ran into was I had a can of paint which was very watery (as shown in the picture below). I tried mixing it with a paint stirrer but it didn’t really work.

The solution I tried was putting an egg beater in a power drill and using that to stir the paint. It actually worked really well, you can see the set up in the following picture. Also I was surprised at how little splashing occurred in the paint when using the egg beater for stirring.

I think it would work better with the actual extension designed for stirring paint, but even the egg beater worked well.

You can see more details in the following video:

Posted in Life Hacks, Uncategorized

Posts navigation

Older posts
Newer posts

Life Hack and DIY Facebook Page

Get more stuff

Subscribe to our mailing list and get interesting stuff and updates to your email inbox.

Thank you for subscribing.

Something went wrong.

We respect your privacy and take protecting it seriously

Proudly powered by WordPress | Theme: x-blog by wpthemespace.com