Skip to content

Life Hack and DIY Lifestyle

  • Things I like
  • Life Hacks
  • DIY projects
  • Home Improvement Basics
  • About Me
  • Resources
  • Lego
  • 3D Printing

Category: DIY projects

Building a basketball backboard

February 20, 2025February 20, 2025 admin

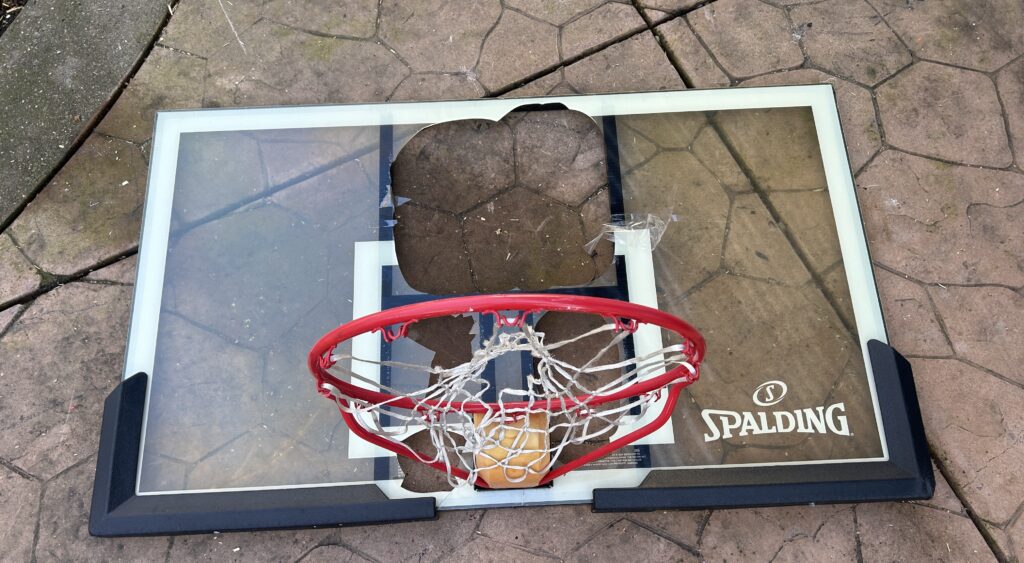
I have a basketball hoop and recently the backboard (which was plastic) started to crack. A few weeks later the plastic pieces started to fall off so I needed to replace the backboard. In my neighborhood I noticed that other people had similar issues with their plastic backboard breaking into pieces. Essentially the plastic would weaken over time due to exposure to the sun and then it would break.

This is my old plastic backboard, which broke apart.

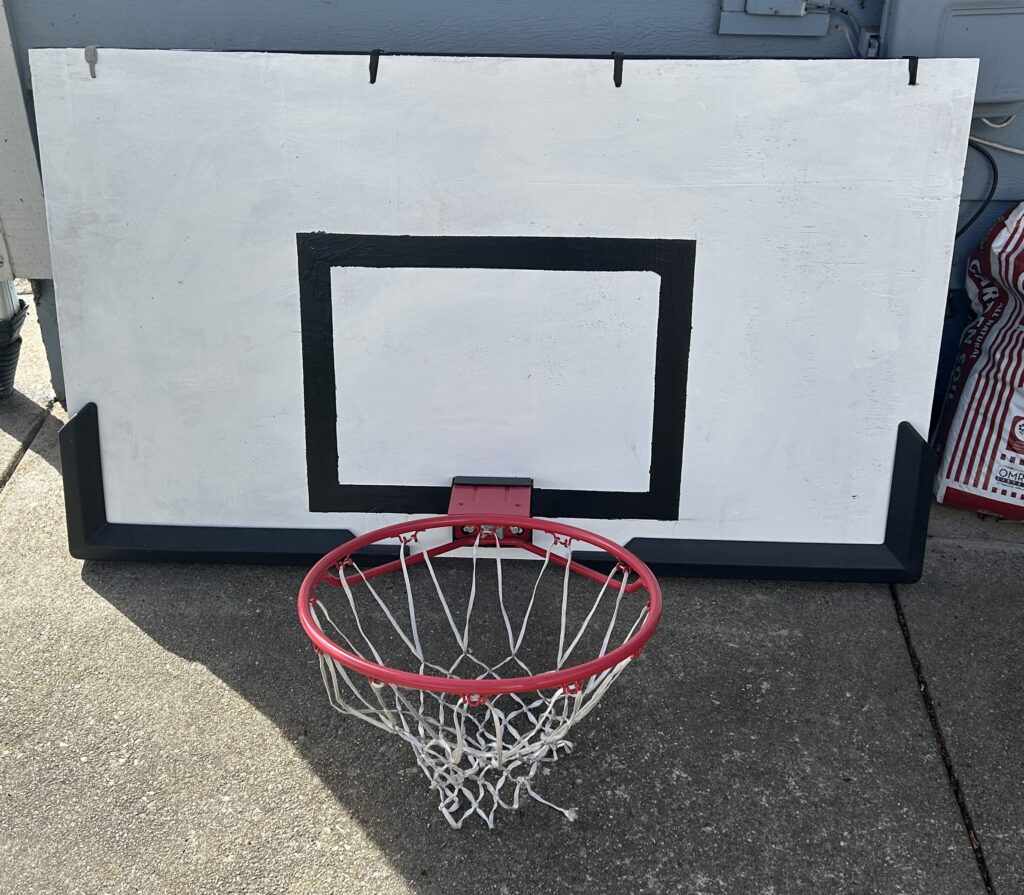
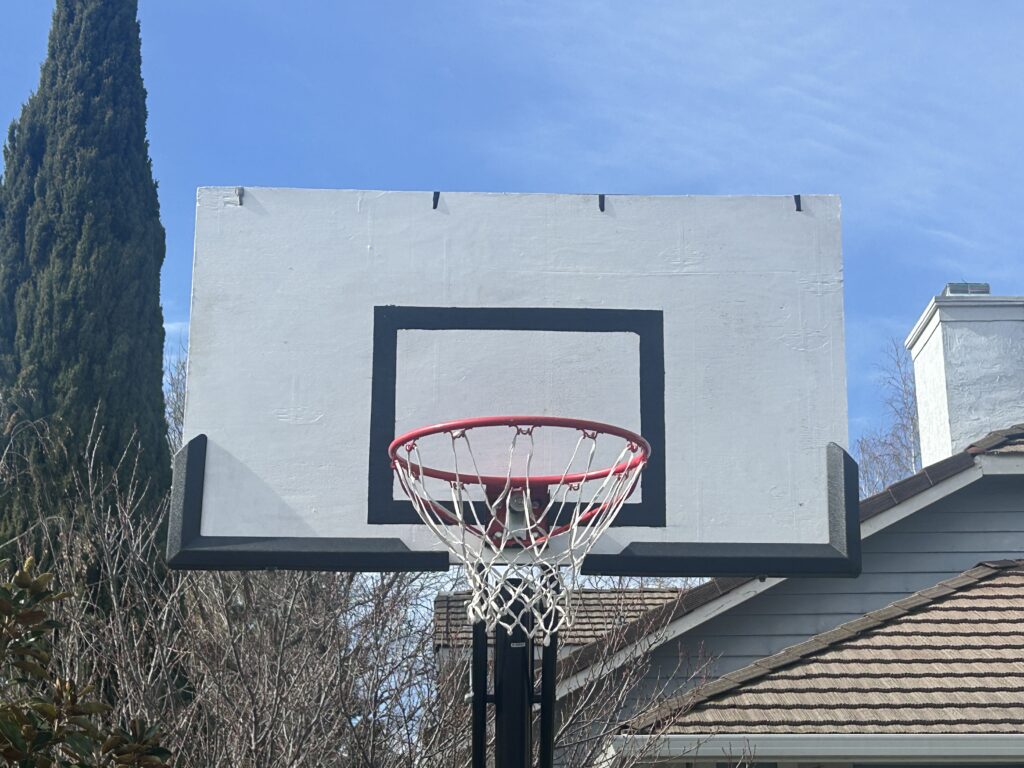
Therefore, I decided to replace my backboard with a wooden backboard as this would be more durable than plastic. It didn’t seem too difficult of a project so I decided to build it myself. This is the finished product, I think it turned out really well.

This is the finished backboard.
Here is the new backboard put in place on the hoop.

Building the backboard took the following steps:

Step 1: Remove the old backboard: Removing the backboard from the set up wasn’t that easy. I made sure to note how everything went together and not lose any pieces so I could put it back together. It turned out the plastic backboard was primarily held in place with glue. I was able to pull most of the backboard off and broke the rest off with a hammer.

Step 2: Cut the new backboard to the right size: I bought a piece of plywood to serve as the new backboard. It was 5/16 inches thick, which was at least double the thickness of the plastic it replaced. I cut the plywood to the exact dimensions of the backboard frame so that it was the exact size of the backboard it was replacing.

Step 3: Prepare and paint the backboard: I sanded the backboard smooth first. Then I drilled the four holes for the hoop. Next I painted both sides of the backboard, two coats on each side.

Step 4: Paint the “shooting square”: Next I painted the square in the middle of the backboard (I painted it black). It is actually a rectangle, not a square, but online it was said that it is called the shooting square. To make sure I got the dimensions of the square correct I made the square out of Lego, then outlined it and filled in the outline with black paint (again two coats).

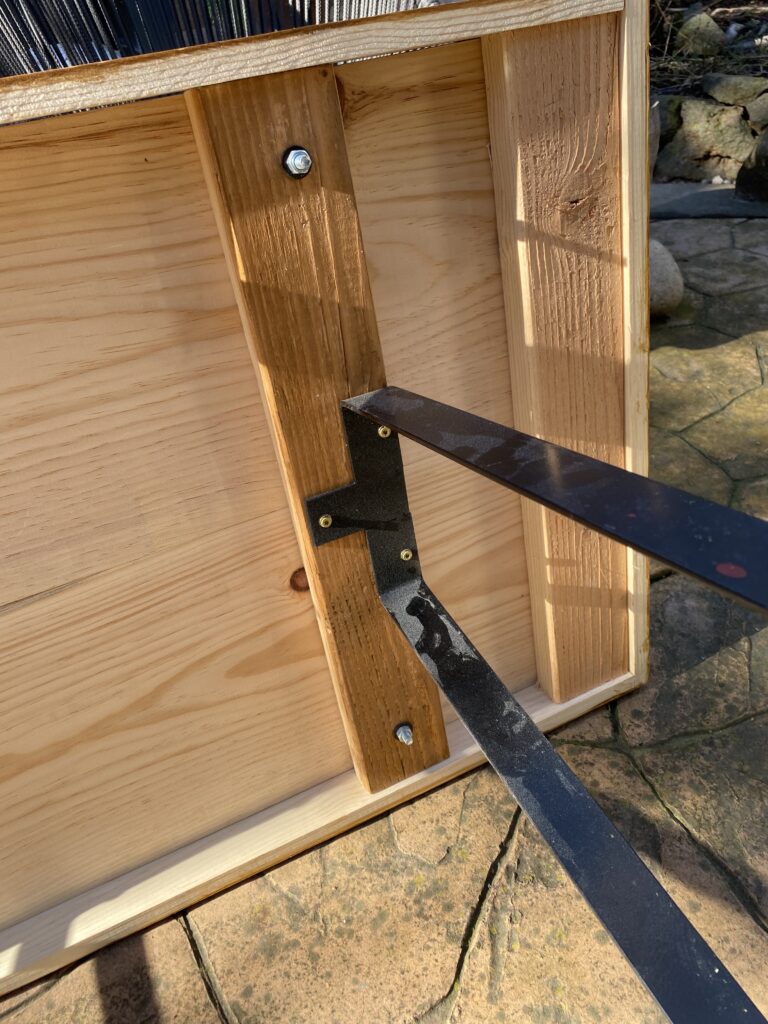
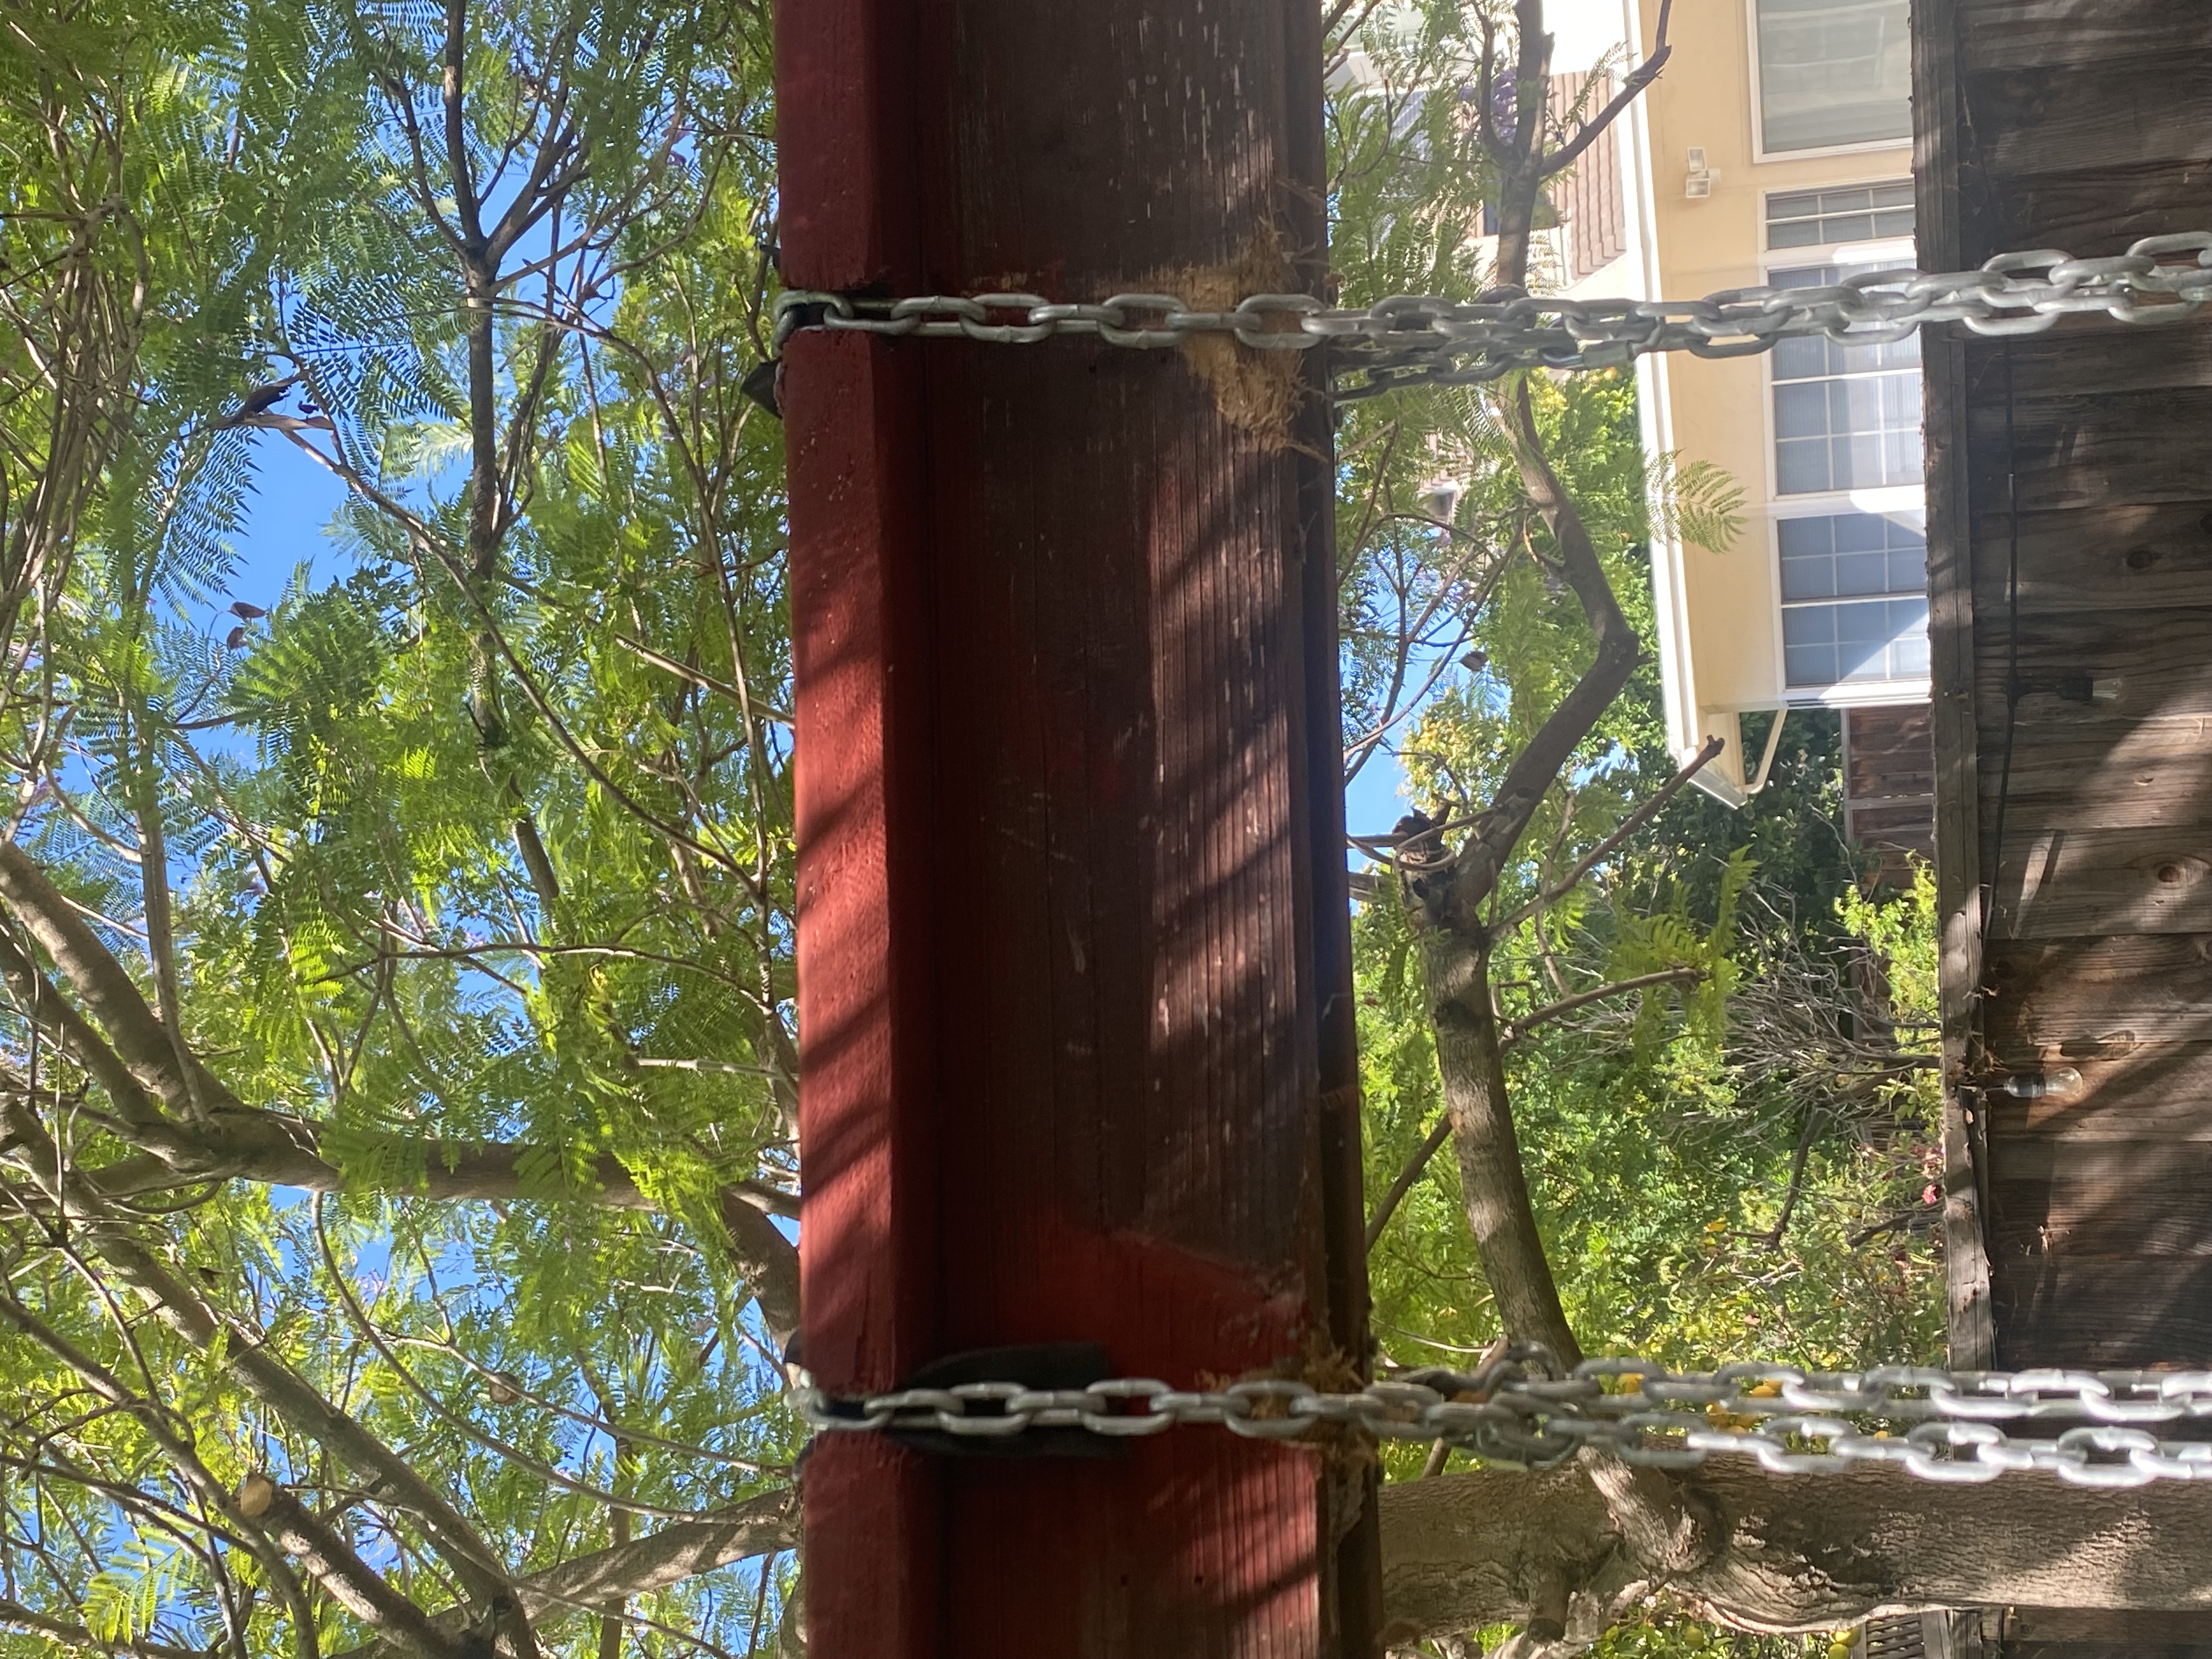
Step 5: Add straps to the top of the backboard to keep it in place: The previous plastic backboard was primarily held in place with glue. It also had screws at the bottom where it connected to the hoop. When I connected the wood backboard to the screws at the bottom the top part was still loose and the whole backboard leaned. To fix this I drilled four small holes at the top of the backboard and threaded each hole with a velcro strip to secure the backboard to the metal frame. You can see the straps in the red box in the picture below, I tightened them as much as possible to keep the backboard in place.

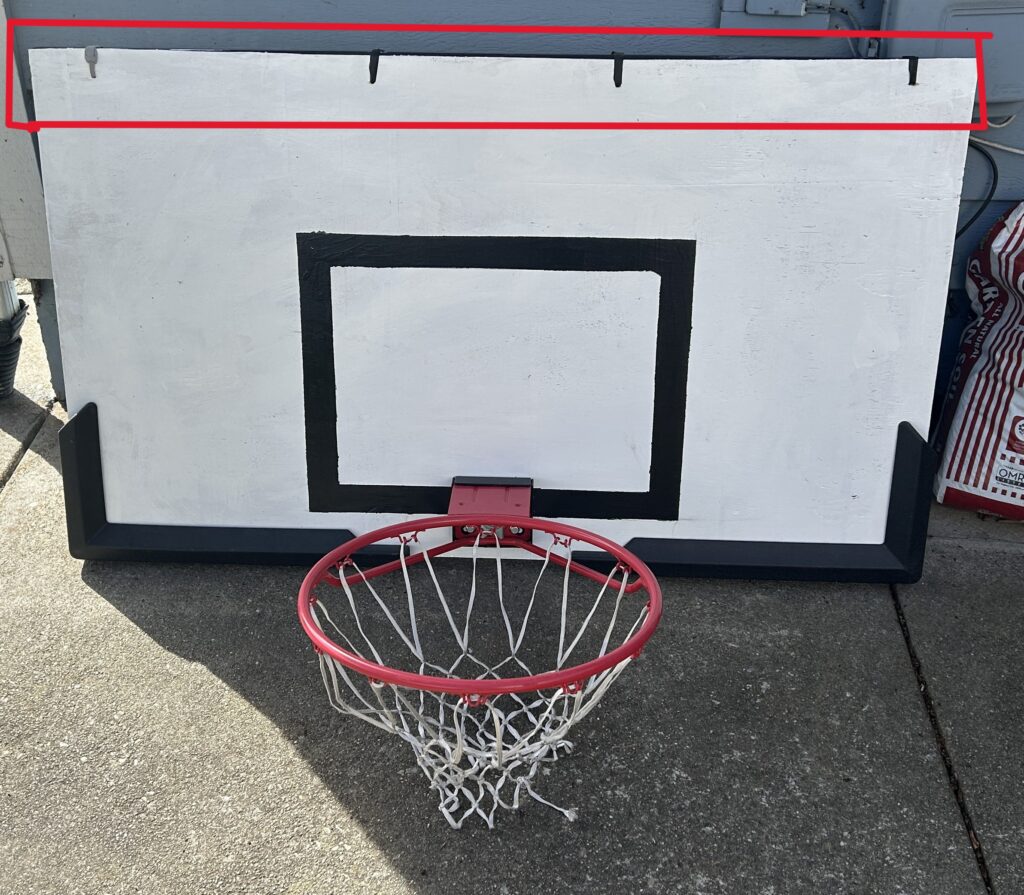
So far the straps have done a good job of keeping the backboard in place.

Step 6: Last step: Re-attach the backboard to the hoop: In this step, I basically put everything back together. The hoop was attached to the backboard and the whole thing was then attached back to the pole. I made sure to note how everything connected when I took it apart to make it easier to attach things back again. I also made sure to keep track of all the pieces.

That is the complete summary of the project. It took about 5-7 hours in total, spread over a week due to the coats of paint.

You can see a more detailed summary in the following video:

Posted in DIY projects

Building a basic stool

August 23, 2023August 23, 2023 admin

In this project I built a basic stool. A stool I owned (made of plastic) broke, so I thought I would make one of wood that would last a long time. It turned out pretty well. This is how it looks:

Stool – Front View
Stool – Top View

The steps to make it were pretty simple.

  1. Cut four legs: I cut four legs out of a 1 by 1, they were roughly 18 inches long (so the stool is about 20 inches tall, 18 inches plus a two inch top board).
  2. Cut a connector board for the legs: Each set of two legs are connected via a connector board. They are held in place with bolts.
  3. Add a side board: I added a side board to each side, which was screwed into the legs and the connector board. By being connected to two separate boards everything is held in place and can’t move.
  4. Add the top: I added the top by drilling a hole through the top and each connector board and have a bolt go all the way through (so two bolts total). I counter-sinked the bolt so that when you stand on the top you won’t feel the bolt under your feet.
  5. Sand and paint: I sanded everything so it was smooth and then painted it white.

You can see more details on the stool in the following video:

Posted in DIY projects

DIY Project- Making a 3D printer spool holder

February 19, 2023February 25, 2023 admin

This is a very simple project where I made my own spool holder for my 3D printer. This is how it turned out:

I have a 3D printer and some times the filament spools are too big to fit the machine. Since they are too big to fit in the machine you have to create a spool holder to hold the filament and allow the filament to be slowly pulled into the machine while printing. I looked on Amazon and found filament holders for about $15 or so.

However, it seems pretty simple so I decided to make one of my own. This required the following steps:

Step 1: I used a flat wide board as the base of the spool holder. I used this board to reduce the likelihood that the spool holder would fall over and overall make the spool holder more safe.

Step 2: Screw in a centered two by four to the flat board. The two by four is just a bit wider than the spool, so it is a good base for the extended boards which will hold the spool.

Step 3: Add the extender boards to the two by four. These boards are long and thin to hold the filament spool.

Step 4: Drill a hole in each extender board big enough to fit the bolt. Place the bolt through one hole, through the filament spool, and then through the hole of the other extended board. Add a nut to keep the bolt in place.

That’s it, you are done!

You can see more details in the following video:

Posted in DIY projects

DIY Project – Outdoor Table Take Two

February 5, 2023February 5, 2023 admin

This is my second take on building an outdoor table. The first attempt worked out fine (see more details here: https://lifehackanddiy.com/diy-project-outdoor-table/) but the table top was made out of fabricated wood and it eventually split due to the elements.

This is how the new table turned out, I think it turned out really well.

This is how the completed table looks.

The basic construction is that I bought a 18 inch wide 8 foot long board and cut it in half, resulting in two boards. I put these boards together to make a 3 foot wide and 4 foot long table.

Below are step by step instructions on how I built the table.

Step 1: I cut a 18 inch wide, 8 foot long board in half. This resulted in a table top of 3 ft by 4 ft. Of course, I had to measure a lot and do some sanding to make it all even.

Step 2: I built a base for the legs. The base was made of two by fours. I connected the legs to the two by fours with torque screws. I wanted to make a base for the legs as the table top was relatively thin and I wanted something more substantial keeping the legs in place.

Here is a shot underneath the table. You can see the legs connected to the two by fours which are then connected to the table top with bolts.

Step 3: I connected the two by fours to the table top with bolts and nuts (two bolts per leg, so four bolts total). The end result is that the table top is smooth except for these four bolts as shown in the picture below:

Here is the table top. You can see how it is two boards put together, and how the top is smooth except for the four bolts which support the legs.

Step 4: I added a trim board all the way around to help keep the table top in place. Before I added this trim the table had the ability to shift out of alignment. With the trim in place this cannot happen.

Step 5: I added two more two by fours, one at each end of the table. This again was to add more stability to the table.

This is a shot of the end of the table. You can see the two by four I added to give the table more stability.

Step 6: I sanded and stained the table. And that was the last step, all done!

Here is a video summarizing this project:

Posted in DIY projects

DIY Project – Renovating my swing set

September 4, 2022September 5, 2022 admin

In this project I renovated my kid’s swing set so that it could support adults.

This is how the swing set looked before any renovations. Note that it actually had three swings but I had already removed one of the swings before taking this picture.

This is the swing set before any improvements (plus dog)

The idea was to upgrade the swing set so that it could support adults. This required the following upgrades:

1.Replace the swing chains: I wasn’t sure how much weight the current chains could support. Also, the current chains were rusted. So it seemed best to just replace them.

2. Replace the swing (the part you sit on): The set still had the original swings which were meant for little kids. I replaced them with stronger swings I found on Amazon.

3. Strengthen the beam the swings sit on: Previously the swings were held in by a long screw / eye bolt with a hole in it, so all the weight of the rider was on the swing. I didn’t think this would work for an adult that weights 200 pounds. So I added an additional beam on the top of the swing set and had the swing set chain go over this board.

4. Create new swing “tracks”: I created track for the swing chain to go over the support beams so the chain would not move around and damage the wood but would stay in one place.

5. Stabilize the swing set: The swing set had a tendency to wobble (and even slightly come off the ground) when multiple people were on the swings. To prevent this I added more weight to the side of the swing set that didn’t have the platform.

Here are more details on each of these steps:

Step 1: Replace the swing chains: I bought new chains at Lowe’s. They were rated for 500 lbs so they should definitely be strong enough to support an adult. I bought eight foot chains lengths, which were about a dollar a foot.

I also bought chain accessories to connect the chain to itself and to connect the chain to the swing.

To connect the chain to itself I used a “quick link” (At least this is the name it is given on Lowe’s). It is a chain link which was a portion that unscrews. How it works is that you unscrew the link, connect the two pieces of chain, and then re-link them by screwing the quick link closed. To connect the chain to the swing I used what Lowes called a Spring Snap, which is similar to a carabiner.

This is a quick link, which is what I used to connect the chain to itself.
This is a Spring Snap, which is like a carabiner. I used this to connect the chain to the swing.

Step 2: Replace the swing: The original swing set had a swing built for children which I don’t think could support a lot of weight. So I replaced the swings with adult swings which could support my weight which I found on Amazon.

This is the new swing I bought on Amazon, it is rated to support up to 660 pounds.

Step 3: Strengthen the beam the swings sit on: To strengthen this support beam the swings sit on I added a extra board over the top of the swing.

Step 4: Create tracks for the swing: I wanted to create tracks for the swing so that it would always swing in a straight line and the swing would always contact the same portion of wood. To create the track I first drilled hole with a spade bit. The goal was for the swing chain to go through these holes. Then I put a track of rubber down on the area where the swing chain would contact the wood. This way the swing would not damage the wood as it swung, but would instead put pressure on rubber, which hopefully could take the weight. The rubber I used to make the track for the chain is actually meant to be used on the bottom of garage doors. I bought it on Amazon, you can see details in the picture below.

This is how the rubber looks like I used to make the track for the chain.

I had the chain go over the rubber and through the holes I drilled to keep the chain in place. This is how the final product looked. You can see the drilled holes and the chain going through, which is supported by the rubber.

Step 5: Stabilize the swing set: As I mentioned before, when the swing set had multiple people on it the swing set would shift and parts of it would even come off the ground. To make it more stable I bought four cinder blocks which weighed 40-45 pounds each. They also only cost $5 each. Next I put a chain through the cinder blocks and attached the same chain to the swing set. This is how it looked in the end:

Here are the cinder blocks I chained to the swing set to give it more stability.

This was the final step. After this I was done. It was a decent amount of work but it turned out pretty well. See more details in the following video:

Posted in DIY projects, Uncategorized

DIY Project- Building a three level printer stand

June 30, 2022June 30, 2022 admin

In this project I built a 3 level printer stand.

This is how it looked when finished:

Here is the finished printer stand.

Here are some details on the finished stand:

-Level 1 was to hold printer supplies. I made this level five inches off the ground. The level itself was 8 inches tall.

-Level 2 was to hold my laser printer. The printer is pretty big and heavy. This level was 13 inches off the ground and was 24 inches tall.

-Level 3 was to hold my 3D printer. The printer is tall but not that heavy or wide. I placed it at the top so that nothing would get in the way of the printer’s height. I made level 3 36 inches tall, as this is the same level as my dresser.

General structure: The general structure of the printer stand is that the four legs would be made by 2 x 4s, and each level would have a horizontal 2 x 4 (or 1 by 1 on the first level) to support a plywood rectangle. The rectangle was almost a square, the dimensions were 22 inches wide and 24 inches deep.

Steps to build it:

  1. Cut the platform pieces to the correct size: This might not have been the ideal first step, but I cut the platform pieces (which were 22 inches by 24 inches) first and based everyone on these pieces. If I had to do it again I would probably cut each platform piece as needed which would allow for the fit of the platform pieces to be more exact. Regardless, my platform pieces were made of plywood. I had a few thicknesses of plywood to use and used the thickest plywood for the laser printer platform as that was the highest piece.
  2. Cut the legs: This was pretty simple, I cut four 2 x 4s to be 40 inches long. The top platform will be 36 inches high so the legs will extend beyond the top platform by about 4 inches.
  3. Build platform one: This platform was 5 inches off the ground. I cut two one by ones to support the platform. I drilled a hole and secured these to the legs with a hex bolt and nut. Then I screwed the platform to the one by one support, using Torx screws. Last, I added one board to each of the sides without the supports. These boards were to keep the legs more stable.
  4. Build platform two: This has the same steps as building platform one except I used a 2 x 4 for the platform support.
  5. Build platform three: This has the same steps as building platform one except I used a 2 x 4 for the platform support.
  6. Sand and paint all the wood: I sanded all the wood (to get it ready for painting), and then I painted everything black.

And that’s it! It took a while to make but I am pretty happy with how it turn out. You can see more details in the following video:

Posted in DIY projects

Strengthening a bookcase which was falling apart

June 2, 2022June 25, 2022 admin

This is a simple project where I renovated / fixed a bookcase. The bookcase was old and had the following problems:

  1. The shelf was sagging
  2. The top was sagging
  3. The sides were drifting apart

The sides drifting apart made me wory the whole thing might collapse. I decided to strengthen it by screwing in a permanent shelf. For this shelf I used a thick board I had lying around, which I painted black.

I screwed it into the bookcase, using the holes for the existing bookshelf stoppers. This extra board made the whole bookcase feel much more secure. I think that now it will last many more years. See details in the following picture:

This is how the bookshelf looked after adding the permanent shelf.

This was really easy and a great way to add extra life to the bookcase. If I have similar issues with my other bookcases I will do the same thing. See more details in the following video:

Posted in DIY projects

Renovating a dog house

May 14, 2022June 2, 2022 admin

In this project I took an old dog house I found on the street and made it look like new.

This is how the dog house looked before I fixed it up

The dog house was in relatively good shape except for the following three things:

  1. The roof was falling apart
  2. The paint was dirty and faded
  3. The roof hinges were falling apart

The first thing I did was make a new roof, using the existing roof frame but replacing the rest of the roof. Next I sanded all the wood down to remove the dirt and get the wood ready to be painted. Then I replaced the hinges with some door hinges I had lying around.

Next I gave the dog house a fresh coat of paint. This is how it turned out, I am pretty happy with the result:

This is how the dog house looked after fixing the roof and giving it a new coat of paint.

You can see more details in the following video:

Posted in DIY projects

DIY Project – Making your own dog food and water bowl stand

March 4, 2022June 25, 2022 admin

In this simple project I made a stand for my dog’s food bowl and water bowl. This is how it looked.

It was a really simple project. First I took a wide flat board, about 12 inches by 20 inches. Then I cut some legs from a 2 x 4 to be two inches wide. Next I screwed the legs into the board, sanded everything, and then painted everything. That’s was basically it. The stand is useful as it raises the bowls off the ground so they are less likely to be stepped on or knocked over. Also, if there is a spill if will be easier to spot.

Here is a video which provides more details.

Posted in DIY projects

Christmas Tree Stand Stabilizer

December 15, 2021December 16, 2021 admin

I had an issue with my artificial Christmas tree stand in that the screw ports to keep the stand stable had worn out (the tree is probably 5 years old). Therefore the screws to keep the tree in place were loose and couldn’t be used at all. This led to the tree stand collapsing on its own and the whole tree falling over. You can see a picture of the stand which kept falling over below.

This is the type of tree stand I had issue with as it would collapse.

To fix this problem I decided to add a stabilizer to the tree stand. The stabilizer was a block of wood, where I cut a hole down the middle to fit the middle part of the stand and also cut spaces for the legs. I used a spade bit in a power drill to cut the hole and used a Mitre say to cut the spaces for the legs. The stabilizer holds the tree stand in place so that the legs can’t move (and therefore they can’t collapse). I also spray painted the stabilizer green to match the tree.

Here is how the stand supporter looks.

Overall I am really happy with how the tree stand support came out. Your can see more detail on how to build it in the following video:

Posted in DIY projects, Life Hacks

Posts navigation

Older posts

Life Hack and DIY Facebook Page

Get more stuff

Subscribe to our mailing list and get interesting stuff and updates to your email inbox.

Thank you for subscribing.

Something went wrong.

We respect your privacy and take protecting it seriously

Proudly powered by WordPress | Theme: x-blog by wpthemespace.com