Skip to content

Life Hack and DIY Lifestyle

  • Things I like
  • Life Hacks
  • DIY projects
  • Home Improvement Basics
  • About Me
  • Resources
  • Lego
  • 3D Printing

Category: DIY projects

DIY Project: Making a trivet out of pine and oak

August 9, 2020August 15, 2020 admin

For this project I made a trivet out of pine and oak wood. A trivet is a small plate or board placed under a hot serving dish to protect a table or surface. This is how it turned out:

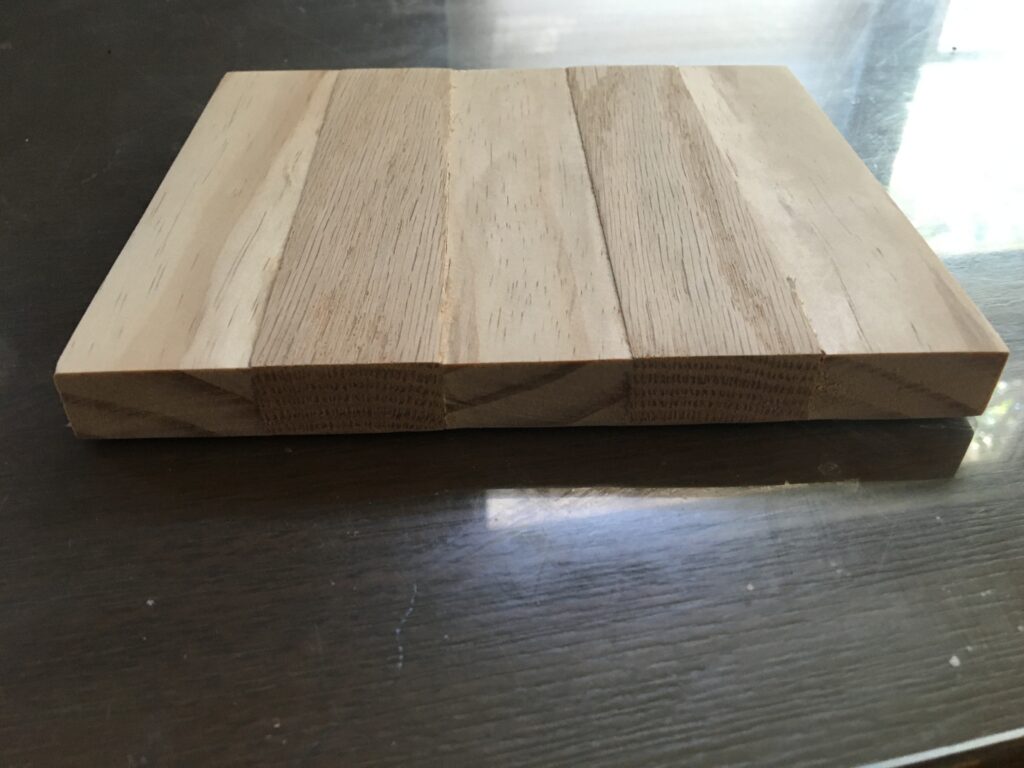
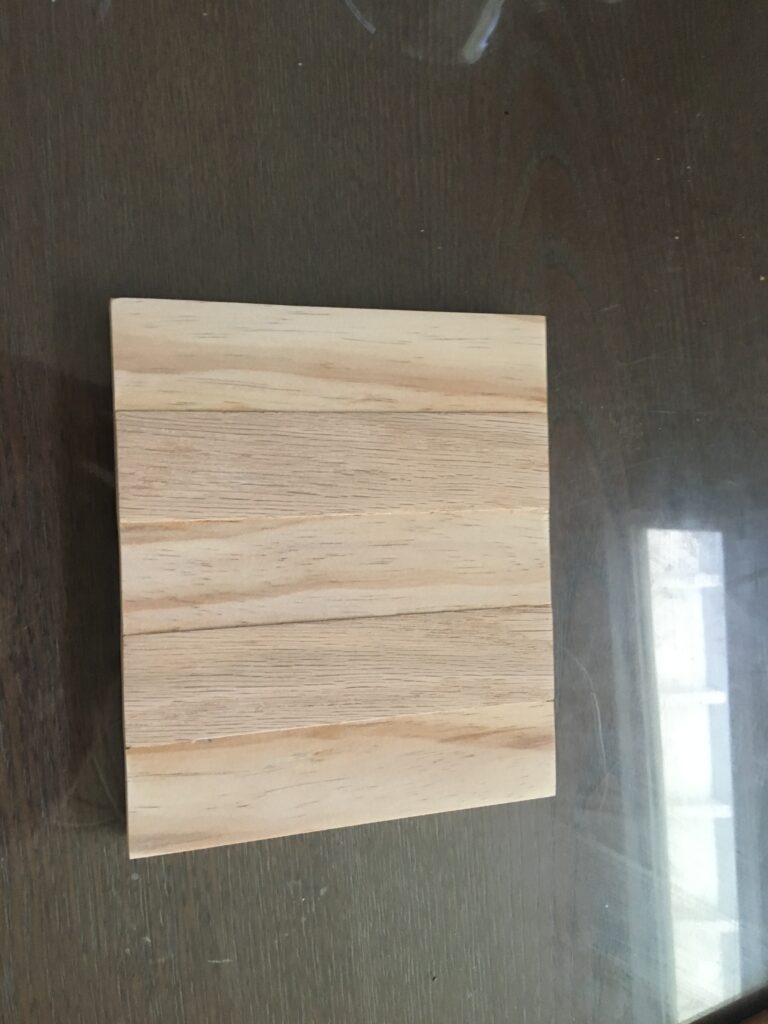
The process to make the trivet was easy. I cut three pieces of pine wood and two pieces of oak wood, all the same size. Then I glued them together overnight, holding them with three different clamps. After that I sanded it to remove any rough spots. I was going to stain it but my wife told me not do so I did not.

The whole project only took 10-20 minutes of work. It was really easy and I was really happy with how it turned out. See more details in the following video:

Posted in DIY projects

DIY Project – Two Tier Plant Stand

July 18, 2020July 19, 2020 admin

This project is a two level plant stand. It could also be used as a display stand or a combo display stand / plant stand (such as having a plant on the top level and a picture on the bottom level).  It is a pretty useful thing to have in your house, you could also use it as a side table but would likely want to shorten the legs. The materials were inexpensive, I think total materials cost less than $15. The project came out pretty well, this is how the final project looks.

The dimensions of my plant stand are: 34 inches height (for the four posts), 20 inches in width and 20 inches in depth.

The steps to make the plant stand are pretty simple (See below). Also, before attaching anything I would sand it as it is easier to sand boards before they are attached.

Step 1: Cut the four legs (which are 34 inches long in this case): The legs I used were from a 1 inch by 1 inch square pole. An eight foot pole of this wood cost about $4 (wood was cheap).

Step 2: Cut the support boards and attach to the legs: These boards are the horizontal boards which will support the two shelves. I had two support boards per shelf. I screwed these into the legs using Robertson screws (I prefer Torx screws but have a ton of Robertson screws lying around).

Step 3: Cut and attach the two shelves: In this step you cut the shelves to the right size and screw them into the support boards. The wood I used for the shelf was one wide board but you could make each shelf using two boards.

Step 4: Attach stability boards under the shelves to make the plant stand stable.: To avoid the plant stand leaning I attached boards connecting the legs to each other. I attached four of these for each shelf (essentially making a square with the support boards). This kept the plant stand very stable. You can see these in more detail in the video.

Step 5: Paint the plant stand (optional): I hate painting but really took my time painting this project. It worked well, as the blotching / pooling of the paint was minimal.

Those are all the steps to make this. Including painting I would estimate making this project to take 3-6 hours.

The following video provides more details on building this project:

Posted in DIY projects

DIY Project – Squirrel Picnic Table

June 9, 2020June 17, 2020 admin

A craze which was been circulating is the concept of the squirrel picnic table. If you look on Amazon you will see dozens of squirrel picnic table options, most for $25 or more.

This is a squirrel picnic table I found on Amazon (Selling for $40!)

The construction of the table seemed fairly simple so I decided to try to make my own.

This is the end result, I am pretty happy with how it turned out.

Picnic table in action!

Here are the steps to make the squirrel picnic table.

  1. Create the table legs: This is really simple, just cut four legs at an angle. Make sure the legs are all cut at the same length and the same angle. I used a Mitre saw for all of this, you could use a circular saw but it would make it more difficult to make the cuts exact.
  2. Create the table base: The table base is the board (or boards) which will support the benches and will attach to the legs. In the photo from Amazon the base is two boards while in the table I built it is one board. You just need to cut the boards long enough to support both benches and have the boards be wide enough to attach to the legs.
  3. Attach the table base to the table legs: This step is pretty simple, just screw the table legs into the table base. Make sure to drill a pilot hole as the legs are thin and they could split if too much force is applied.
  4. Create the table top: For this step you just need to cut a board to be the size you want your table top.
  5. Attached the table top to the legs: To attach the table top to the legs I used wood glue and clamped it in place overnight. You could instead use screws but since the legs attach to the table top at an angle there is a decent chance the wood will split so I wouldn’t recommend it.
  6. Create the benches and attach the benches to the table base: For this step you need to cut the two pieces which will serve as the benches. Next screw the benches to the table base.
  7. Attach a board to connect the picnic to the fence: I added a board which would connect the table base to the fence, going perpendicular from the table base. If you go online you will see that there are multiple ways to connect the bench to the fence (other than the method I used).
  8. Attach a container to hold the squirrel food: In the picnic table I made I attached a pasta sauce lid with a screw which will hold bird seed and nuts to feed the squirrels.

And that’s it! It seems like a lot of steps, but the steps are short. From start to finish the project should only take an hour or so.

The video below summarizes the steps to build the squirrel picnic table.

Posted in DIY projects

DIY Project – Building a Hanging Planter Box

May 23, 2020May 23, 2020 admin

This planter box which I made is a real space saver, as it hangs from the fence instead of taking up space on the ground.

Here is a picture of the planter box

By hanging it on your fence instead of the ground you accomplish two things:

1. The plants will get more sun, as they will be above other plants which might block the sun.

2. You will free up more space on the ground for other plants.

The only downside is that you will have to water the plants by hand as sprinklers likely won’t reach high enough.

The construction of the planter box is very simple, it is just a four sided box.  I won’t get into the construction but the dimensions of the box were 12 inches high by 16 inches deep by 24 inches wide.

The more complicated part was developing a system to hang the box to the fence.  To hang the planter I used shelving brackets.  The ones I used appeared very sturdy, so they should be able to support the weight of the planter and the dirt and plants which will be added.  Here is a picture of what the brackets look like, they can be found on Amazon here: https://www.amazon.com/gp/product/B01MTPRUGQ/ref=ppx_yo_dt_b_search_asin_image?ie=UTF8&th=1

I attached the brackets to the back of the planter box with nuts and screws, tightening the nuts as tight as possible.  I then screwed the bracket into the fence with one screw for each bracket.  At the end of the bracket I attached a block of wood which had a screw going through it to hold it in place. A nut at the end of the screw held the block of wood firmly in place.  The block of wood meets flush with the fence to hold the planter box firmly in place. 

This shows how the planter box is held to the fence. It is screwed into the fence. More importantly, at the end of the bracket a wooden block flush to the fence holds the bracket in place.

I describe the planter box and the process to make it and hang it to the fence in more detail in the following video:

Posted in DIY projects

DIY Project – Building a Wooden Stool which can serve as an extra seat

April 30, 2020May 2, 2020 admin

In my house we have several small kiddie stools, but none of them were tall enough for my kids to reach the top shelves. This resulted in my kids climbing on the counters or unsafely manipulating the existing stools to reach what they wanted. Also, we would often run out of seating. Therefore, I decided to build a tall stool that would be high enough for the kids, while also being wide enough to serve as a seat it needed. This is what the result of the project looks like:

The steps to build the stool are as follows. Also, I would sand each piece before attaching it, as that will be much easier than sanding the stool once all the pieces are attached.

Step 1: Cut the stool top to size: For this step I already had a board which was 11 inches wide so I only needed to cut the length. The length I used was 16 inches, which is only a few inches lower than the average chair height.

Step 2: Cut the legs to length: The legs of the stool I made were 16 inches long and were made by 1 x 1s. Note that my legs were extra long to help my kids reach things and also so that the stool could serve as a seat if needed. If the legs were short (say 12 inches) it would be too low to the ground to serve as a seat.

Step 3: Attach the legs to the stool top: To attach the legs to the stool top I used one torque screw per leg for the initial connection. I made each leg be one inch inward from both edges of the stool top. I knew the legs would be very wobbly with just one torx screw, so I added one bracket per leg which screwed into the leg and the stool top. These brackets are very small but are pretty useful. You can get 50 of these on Amazon for $10, they can be found on Amazon here: https://www.amazon.com/gp/product/B079BYC2S4/ref=ppx_yo_dt_b_search_asin_title?ie=UTF8&psc=1

These are the brackets I used in building the stool

Step 4: Add cross boards to the legs to add stability: I added four cross boards to the legs to add stability to the stool. While the brackets helped, the cross boards were needed to really make the stool feel stable. Each cross board was held in place by a bolt and nut. Make sure that the bolts were at different heights so that they do not hit each other.

In this picture I have circled the cross boards.

Step 5: Stain or paint the stool: I decided to stain the stool, but the last step would be to apply some kind of stain or paint to protect the wood.

That is basically it, the steps to make the stool are pretty simple. The follow video shows all the steps described above and also provides some additional details.

Posted in DIY projects

DIY Project – Building a sturdy bench

April 8, 2020April 9, 2020 admin

For this project I built a bench which is very sturdy. I built the bench about four years ago and it has held up very well. This is how the bench looks:

The bench is pretty easy to build. Including painting and sanding I would say it would take 15-20 hours to build.

Below are the steps to build the bench. I am excluding the sanding and painting steps, but I would sand each piece before I add it on to the bench and paint the bench at the very end of the project.

Step 1: Build the bench frame: The bench frame is made up of 2 x 4s. It is a rectangle with a support board down the center. The dimensions for the frame I used was 40 inches long and 16 inches wide. All the boards are held in with Torx screws, the best type of screw there is. For more details on Torx screws view my post here:

This is the shape of the frame, it is a rectangle with a support board down the middle.
Here you can see the actual frame. The legs obscure the view a bit but it is a rectangle with a center board as shown.

Step 2: Attach the legs: The legs of the bench frame are made out of 4 x 4s. The legs were about 19 inches high. Securing the legs could be difficult. To secure the legs I used an extra long drill bit so I could drill from the leg 4×4 and the frame 2×4 together. Then for each leg I put through a long bolt which went through the leg and was secured on the other side with a nut and washer. I put a bolt through each outside edge of the leg to hold it in place, so each leg had two bolts going through it.

This diagram shows the bolts going through each leg (The square is the leg)

Step 3: Attach the bench top: The top of the bench is made of thin boards which I evenly spaced on the top. I also left small gaps in between the boards. All of the boards were secured in with Torx screws. These screws were able to drill all the way through the board and slightly beneath the board so that they are below the board surface and would not touch anyone sitting on top of them.

Here is the bench top. You can see the Torx screws on the edges which are set up so that they are beneath the board surface and won’t touch whoever is sitting on the bench.

This is my favorite of the benches I have made. As stated before, it is really sturdy, it should support at least 400 pounds.

The following video shows some specifics of the bench and details the steps to make it.

Posted in DIY projects

DIY Project – Building a Wooden Chair

March 6, 2020March 13, 2020 admin

For this project I built a wooden chair. To determine the dimensions I would use for the wooden chair I measured the dimensions of chairs around my house to give me a guide. In the end the dimensions I decided on were:

-Seat Height=19 inches

-Seat length (not including back leg): 15 inches

-Chair width: 16 inches

-Back leg height / back rest height: 44 inches

The picture below shows how the chair turned out (painted and unpainted). I am pretty happy with the chair but admit that it is not perfect and could be a little more exact.

Finished chair (unpainted)
Finished chair (painted)

Creating the chair is pretty straightforward and I estimate it would take 6-12 hours to build (before painting).

Here is a summary of the steps to create the chair. After this summary I have a video summarizing the chair and the steps to make it in greater detail.

Step 1: Build the legs of the chair. The back legs of the chair are 2 x 4s cut to the desired height. These legs are bolted to a 1 x 1 horizontal board which is the frame of the seat for the chair. This horizontal board attaches via torque screws to a 1 x 1 board which will serve as the front legs for the chair.

This side view shoes the completed chair leg.

Step 2: Build the seat of the chair. To build the seat of the chair I drilled thin boards into the horizontal boards on the legs of the chair. I spaced the boards apart by roughly a half an inch.

This picture shows the seat of the chair. The board are spaced out by roughly 0.5 inches.

Step 3: Build the back of the chair. To build the back of the chair I drilled thin boards into the chair’s back legs. I spaced these boards apart by roughly three quarters of an inch.

This picture shows the back of the chair. The board are spaced out by roughly 0.75 inches.

Step 4: Adding support boards to increase stability to the chair. The last step to build the chair was to add support boards to increase chair stability. One support board goes across the front legs to keep those boards secure and make sure the legs do not move. The second support board connects the back legs to the horizontal seat boards to keep the back legs stable. If this board is not added the back legs tend to shift based on how you are leaning in the chair.

This support board is bolt (and screwed) into the horizontal boards and also screwed in the rear legs (with screws coming from the sides). This keeps the rear legs in place.
This support board screws into both front legs and keeps them in place.

And with that your chair is done!

The following video describes the step in more detail and shows the progression of the project from start to finish.

Posted in DIY projects

DIY Project – Easel

February 15, 2020February 15, 2020 admin

This project, creating your own wooden easel, is fairly easy. You can buy small easels (2 inches or so) for only a few bucks, so I wouldn’t bother building one that size. However, the easel I built could hold a letter sized piece of paper (8 inches by 11 inches or so). An easel this size (or larger) is more expensive if you buy one ($15 +) and is harder to find.

This is how the finished easel looks (before applying any stain or paint)
This is the finished easel, painted black.

Making the easel is pretty simple and shouldn’t take more than an hour. The only lumber you will need is a 3/4 inch square wooden rod which you can get at a hardware store for only a few dollars. Buy one which is six feet or so, as this rod will be used to make the easel legs, back support and cross beam. The steps to build the easel are shown below. The dimensions I mention are what I myself used to make my easel, but feel free to adjust the dimensions as needed to fit whatever size you want your easel to be.

Step 1: Make the easel legs: The first step is to make the two legs of the easel. For my easel the two legs were 17 inches long, so I just simply straight cut these two 17 inch pieces from the rod. Note that the legs will be placed at an angle which the easel is completed.

Step 2: Make the easel back support: The back support is the rod at the back of the easel. It should be about the same length as the legs, but could be longer depending on how you want it to look. To start I would cut a longer piece than needed (in my case 20 inches) and then adjust it once the easel is put together and I can see how the completed piece looks.

Step 3: Put the back support and legs together: The top of the legs and top of the back support will meet at the top of the easel. To get the legs to meet the back support in a flush manner you need to taper the top of the legs at about a 25 degree angle using a saw (mitre saw would work best). Next clamp the legs and back support together or simply hold it together so you can drill a hole. Then, drill a hole through all three. After that put a bolt through the holes and tighten a nut to it to keep the legs and back support together. Be careful when drilling the hole as it can cause the wood to split, which could require you have to replace that piece.

In this photo (circled section) you can see the tapered legs (with the rods cut at an angle), how they connect to the back support and the bolt going through the legs and back support, held in place by a tightening nut.

Step 4: Add the cross beam: The cross beam is the board which will hold up whatever is being placed on the easel. To add it, you need to cut a piece of the wooden rod to the appropriate length and then screw it into the legs (hopefully using torque screws). The length of the cross beam I used was 15 inches.

Step 5 (Optional): Taper legs and back support rod: One optional step is to taper the bottom of the legs or the back support rod so that it will sit flush with the ground instead of at an angle. If you don’t taper the leg or back support rods they will contact the ground at a single point and it will be less stable than if it was flush to the ground. However, it is stable enough even without tapering the rods, which is why I would say tapering the rods is optional. To taper a rod you just need to cut the end of the rod so that it will be flat when it touches the ground.

The picture below shows both tapered and untapered ends to the easel rods.

This picture show tapered (marked B) and un-tapered (marked A) legs / rods.

Step 6 (Optional): Paint or stain the easel: This is self explanatory, but if you wish to stain or paint your easel it is probably best to do it at the end. However you could also paint it before applying the screws and bolts.

The following video provides a summary of the steps to build the easel.

And there you have it, all you need to build your own easel.

Posted in DIY projects

DIY Project – Bike Storage Rack

January 23, 2020January 23, 2020 admin

Both my kids are of bike riding age, so we have four bikes in our family, and do not have room to store them in our garage. We used to simply park them outside, uncovered. However, the bikes would rust over time due to being exposed to the rain and stopped working properly. The same thing happened with my kids scooters.

So my idea was to create a storage rack for the bikes and scooters that would be outside but would protect the bikes and scooters from the rain. The photo below shows what I came up with:

This is the side view
This is the front view (with the awning down)
This is the front view (with the awning up)

The steps to build the bike rack are shown below. Note that it will take a while to build it, an honest estimate would be 20+ hours of time to build it.

Step 1: Build the initial frame: The initial frame is two vertical boards and a horizontal board on the top. To keep the frame from swaying you need to add an additional support in the corner of the frames. Here is a picture of the corner supports I used.

You can get similar ones on Amazon here: Angle Code, WEBI Stainless Steel Corner Braces, Trapeziform Angle Brackets, Multi-Angle Joint Fastener, Shelf Support for Desk Edge, Box, Wood Beam, 3 Pack

The frame supports make the frame much stronger. Without them the frame would sway and possibly collapse, which is why I added the supports.

Step 2: Build the “feet” of the bike rack. The feet are the horizontal boards at the bottom of the bike rack which will attach to the initial frame and will keep it in place. To keep the bike rack steady I had a board on the outside and two boards in line with the vertical board to hold the feet in place. I also placed a 50 pound bag of rocks on each foot to hold it in place. You could add any weight you want to hold the feet in place, it obviously does not have to be a bag of rocks.

The picture below shows how the feet look, you can see the two horizontal boards which hold the vertical board in place:

Step 3: Add the bike hooks to the frame. The next steps is to add the bike hooks to the horizontal board. These are the hooks from which you will hang the bikes, scooters and so on. Installing the hooks is very easy as the hooks have a screw on one end and you simply twist them into the board (although it does take a decent amount of force to get the hook started). They are also fairly cheap, you can get a 8 pack of hooks for $14 on Amazon here: StoutMax Heavy Duty Bike Storage Hooks Set, 8 Pack

This is how the hooks look:

Step 4: Build the awning frame: If you don’t need to protect your bikes from the elements (rain, etc.) then your bike rack is done (besides painting). For those of you who do need to protect the bikes from the elements you need to build an awning. The frame for this awning will consist of five boards. It will have two long horizontal board which will stretch the distance that the awning will cover. At the end of each of these boards will be a short vertical board. This is because you don’t want the awning to be completely flat as rain water would pool on the awning. You want the awning to be on a decline so that rain water will roll off the awning. The last boards of the awning frame will be long board which will go the width of the bike rack and will hold the awning.

Here is a picture of the awning.

Step 5: Paint the bike rack: The next step would be to paint or stain the bike rack to protect the wood. I painted the bike rack white as you can see in the photos. It is much easier to paint the bike rack before installing the awning, as the awning can get in the way and will likely get paint on it.

Step 6: Install the awning: The awning is a tarp which will cover the bike rack and prevent the bikes, etc. from getting rained on and protect them from the sun. For the awning you will want to use a heavy tarp (10 millimeters thick), not a light tarp (less than 10 millimeters thick). If you use a light tarp in a year or less the sun will wear the tarp down to the point that it tears or otherwise starts falling apart.

Heavy duty tarps are more expensive than lightweight tarps, but still are not that expensive. The 6 ft by 8 ft tarp I used on my project cost about $16 and can be found on Amazon here: Super Heavy Duty Brown Tarp 8 Oz, 6’X8′

This is how the heavy duty tarp looks.

To install the awning I screwed it into the cross board at the end. I screwed it in with a screw and a washer in the grommets of the tarp.

This is a picture of the grommets in the tarp, which are spaced every 12 or 18 inches.

I also attached the midpoint of the tarp to the cross beam at the end of the horizontal board. This was attached with clamps.

And there you have it, after all these steps your bike storage rack will be done.

The following video provides a summary of the entire process to make the bike rack.

Posted in DIY projects 1 Comment on DIY Project – Bike Storage Rack

DIY Project / Life Hack – Building your own umbrella base stand

January 10, 2020January 11, 2020 admin

Instead of buying an umbrella base stand I wanted to see if I could build one using materials I had around the house. The umbrella stand I came up with is shown in the following photo:

Building this umbrella stand was very easy and the materials cost $5 or less (assuming you already have a spade bit).

The base of the umbrella stand will be a five gallon bucket which you can get at any hardware store. To give the bucket / base weight and make it stable, I added sand, which you can also get at a hardware store. You can get a 50 pound bag of sand for $5 or less from a hardware store, or just get some you might have lying around in the yard. You also could potentially use dirt, but it will be less fine and not work as well.

To hold the umbrella in place a board is put on top of the bucket and a hole is cut in the board to fit the umbrella pole.  It is ideal to drill the hole the same size as the umbrella pole diameter so that the pole is held snugly in place.  To drill the hole wide enough you will need to use a spade bit on your electric drill.  A spade bit looks like this:

Spade bits are pretty common, you can get a set of spade bits on Amazon here: DEWALT DW1587 6 Bit 3/8-Inch to 1-Inch Spade Drill Bit Assortment

The next step is to attach the board which will hold the umbrella to the bucket.  I used a bracket on each side of the bucket, which I attached to both the board and the bucket with a screw.  Brackets like the one I used can be found on Amazon here and are shown in the picture below: Smbbit Stainless Steel Shelf Support Corner Brace Angle Bracket Angle Code Right Angle 6 hole, 38mm x30mm x1.3mm(thick) (8Pack)

The last step, which is optional, is to paint the stand so that it is more ascetically pleasing.  Since I was painting plastic, metal and wood all together I decided to just use spray paint.

And with that you are done on your umbrella stand is complete. They whole project should not take more than an hour, even if you do decide to paint the umbrella stand.

A video summarizing how to make the umbrella stand can be found here.

Posted in DIY projects, Life Hacks

Posts navigation

Older posts
Newer posts

Life Hack and DIY Facebook Page

Get more stuff

Subscribe to our mailing list and get interesting stuff and updates to your email inbox.

Thank you for subscribing.

Something went wrong.

We respect your privacy and take protecting it seriously

Proudly powered by WordPress | Theme: x-blog by wpthemespace.com