Skip to content

Life Hack and DIY Lifestyle

  • Things I like
  • Life Hacks
  • DIY projects
  • Home Improvement Basics
  • About Me
  • Resources
  • Lego
  • 3D Printing

Category: Life Hacks

Remote control life hack part 2

July 23, 2023August 15, 2023 admin

In this second installment I built a contraption to keep my Roku remote from getting lost. The issue with the Roku remote is that it is small and fragile, so it gets lost easily and breaks easily. To fix this I came up with the following thing I built:

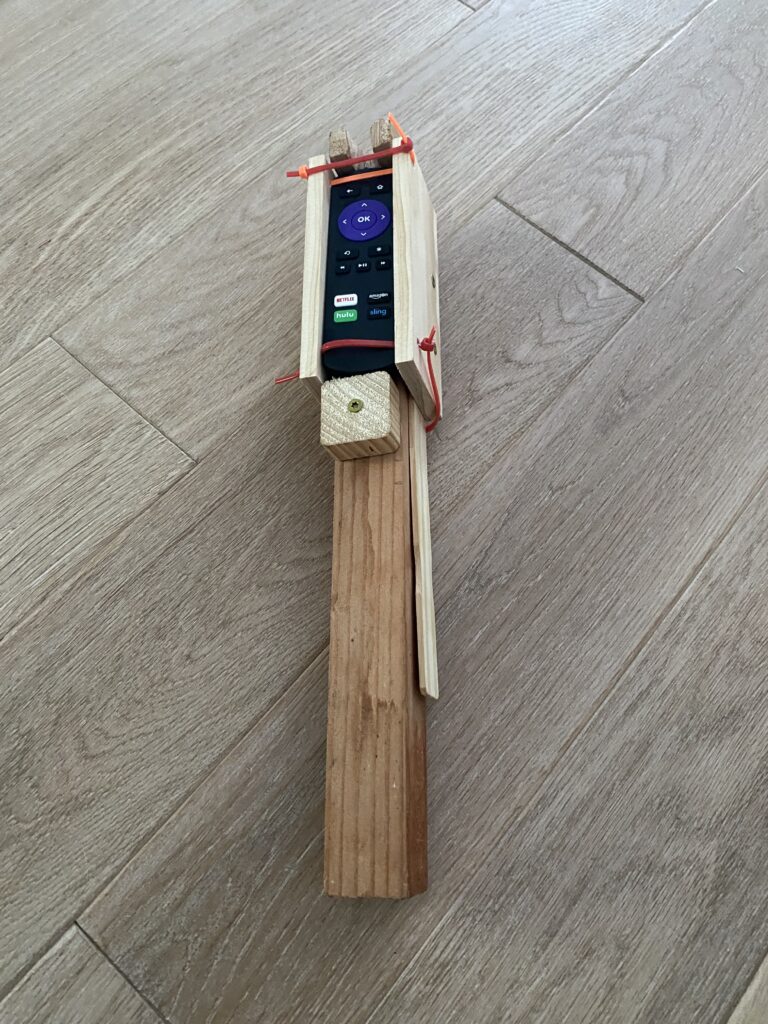
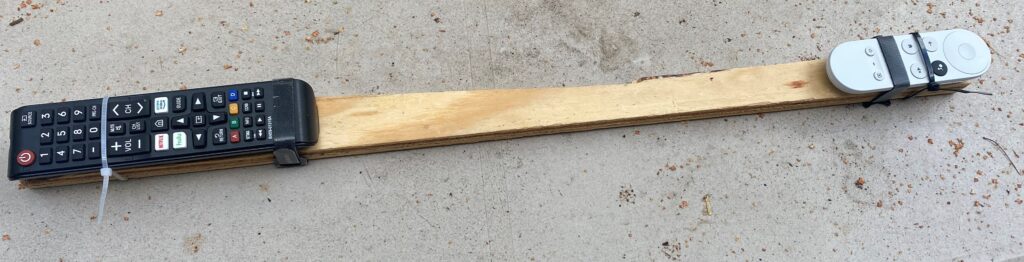
This is what I built to keep my Roku remote from getting lost.

The construction was pretty simple. I took a board the same width as the remote and boxed it in with wood pieces on the sides, bottom and on top. For the top board I cut a whole so the signal could make it through. Then to hold the remote in place I added zip ties. Since I started using the “remote caddie” the remote hasn’t been been lost once, mainly because it is tightly held in place to a long piece of wood.

See more details in the following video:

Posted in Life Hacks

Remote control life hack

July 15, 2023July 15, 2023 admin

My kids kept losing my remotes and their batteries so I developed a life hack that would stop this from happening. It is kind of ridiculous but it has worked so far, see picture below.

This is the contraption I came up with so that my remotes would stop getting lost.

The overall design for it was pretty simple. First I started with a long board that would be easy to find. Then I took the two remotes that work the TV (one turns on the TV and controls volume, the other controls the Chromecast) and attached them. Velcro is too easy to take off, so I started with zip ties, which would have to be cut off. The zip ties went in between two sets of buttons so they would be kept in place. I used velcro afterwards to stabilize the remotes, so each remote has one zip tie and one velcro strip. One downside of the zip tie is that you have to cut the zip tie off to change the battery of the remote, but zip ties are cheap so it is not a big deal.

Anyway, I realize this remote life hack is a little absurd but it does work. I haven’t lost a remote or battery since it has been implemented. See more details in the following video:

Posted in Life Hacks

Life hack – unbreakable patio door lock

July 10, 2023July 10, 2023 admin

This is a very simple life hack to lock your patio door. Simple use a long board cut to length to fit the gap in the patio door, as shown in the picture below.

With the board in place it is virtually impossible to open the patio door. Also, this door “lock” should only cost about $1. See the following video for more details:

Posted in Life Hacks

Life Hack – Making your own garbage can lid

January 28, 2023January 28, 2023 admin

I have a trash can in my backyard which gets really gross when it rains because it doesn’t have a lid. I thought of buying a new trash can with a lid but it seemed like a waste money. So I tried to figure out how to make the lid on my own.

This is the trash can which needs a lid

The solution was pretty simple. I first took an existing lid for a plastic box I already had that was close to the right size. Then to make the lid stay on the can I cut a slit of the lid and a slit on the trash can and tied them together with a velcro strip. Then I spray painted the lid black so it matched the trash can. That was basically it, pretty simple but it saved me from buying a new trash can!

This is the finished result, trash can with a life hacked lid.

Overall a simple but useful life hack. See more details in the following video.

Posted in Life Hacks

Making your own dog fence

November 17, 2022January 16, 2023 admin

I was going to buy a dog fence to fence my dog off from certain areas of my house. However, when I looked on Amazon these fences were $45+ and these were more enclosures than fences. Also these enclosures were 20+ ft long while I only needed a fence for 10 feet or so.

Here is an example of dog fence for sale on Amazon. This is much bigger than that I needed.

Therefore, I decided to make my own dog fence. This is how it ended up looking.

This is how the dog fence turned out. It isn’t pretty but is very functional.

The steps to make the dog fence were very simple. First I cut chicken wire to the desired length. Then to keep the fence stable and able to stand on its own, I added boards at the bottom (held together with a bolt and nut). I also added vertical boards to keep the fence upright. To these I used velcro ties to connect the fence to the vertical boards. And that was it! It was easy and cheap and should last a long time.

You can see more details in the following video:

Posted in Life Hacks

Life Hack – Fixing a broken windshield

September 16, 2022September 16, 2022 admin

We all have have gotten a crack on our windshield due to a rock or similar debris. However, getting the windshield replaced isn’t cheap (usually $500 or more) and if the crack is small it might make more sense to simply fix the crack. The crack doesn’t get fixed so much as sealed so that the crack doesn’t spread. You can pay someone to do this or you to do it yourself rather easily and very inexpensively.

Below are the steps to seal a windshield crack.

The only materials required is the sealant, which can be found on Amazon. I bought the sealant in the picture below for only $3 on Amazon, here is a link to the product on Amazon:

Permatex 81730 Flowable Silicone Windshield and Glass Sealer, 1.5 oz.

Step 1: The first step is to simply the clean the crack of any dirt or debris. This way you don’t seal any unwanted material into the crack. Below is a picture of the crack I am sealing. This is actually the third time I have sealed this crack (which is seven years old). By sealing the crack every few years I have prevented it from expanding.

Here is a picture of the crack I will be sealing.

Step 2: In this step I cover the crack with the sealant. I normally use much more than I need since the excess will end up being scrapped off and the sealant is inexpensive.

Here is the crack covered in sealant.

Step 3: In the next step I squeeze the sealant into the crack to fill any spaces below the surface. For this I took a laminator sheet to push the sealant into the crack. Other materials which could be used for squeezing in the sealant are saran wrap or a trash bag, basically anything to squeeze the sealant into the crack. After squeezing in the sealant leave the sealant alone for 3-4 hours so that the sealant has time to dry.

Here is the sealant forced into the crack.

Step 4: In the final step I remove the laminator sheet and then scrap off the excess with a razor blade. For ease of use and safety reasons I had my razor blade in a razor blade holder when I used it. More details on razor blade holders can be found here: https://lifehackanddiy.com/razor-blade-holder/

Here is the crack with the sealant spread out and dried.

Here is the the remnants of the sealant being removed with a razor blade.

That’s really all there is to it. If you follow these steps you should be able to seal any crack on your windshield, avoiding the need to pay for repairs and pay to have the windshield replaced.

See more details in the following video:

Posted in Life Hacks

Life Hack – Fixing netting with zip ties

July 25, 2022July 29, 2022 admin

This is an easy life hack for fixing netting or mesh lining. An example would be the netting on the side of a lunch bag for holding a drink in place. My kids had their netting get ripped and I didn’t want to buy a whole new bag so instead I just fixed the netting. So to fix it I used zip ties to keep the netting closed which had been cut open. Its very simple to do as black zip ties are pretty common. The whole procedure is putting a zip tie through the hole and then cut off the excess.

I also recently did this for a laundry bag, see pictures below.

You can see the zip ties fixing the laundry bag in the bottom right.
Here is a zoom-in, you can see how I fixed the mesh with zip ties.

Anyway, this is a simple but useful life hack. You can find more details in the following video:

Posted in Life Hacks

Life Hack – Making your own compost bin

March 15, 2022June 25, 2022 admin

This is a really simple life hack. We have lots of leftover food bits after cooking and eating. We have a compost bin which we got from the garbage company. However, the bin had three main problems.

  1. The bin was small and would need to be emptied almost every other day.
  2. The bin was not airtight, so it would attracts fruit flies and other bugs.
  3. The bin wasn’t very stable and would get knocked over easily, spilling everything inside.

Therefore I made my own compost bin as shown below:

This is the compost bin I came up with, it is about 10 inches by 16 inches.

I made my own compost bin which fixed these problems. First, I found a good sized plastic bin with an attaching lid which would latch on. Then I bought extra large compost bags on Amazon. You can get 9 gallon compost bags (equivalent to a tall kitchen garbage bag) for about 10 cents on Amazon. Simply use these compost bags in the plastic bin and you have your own large air tight compost bin.

See more details in the following video:

Posted in Life Hacks

Life Hack – Build your own extra long ceiling cleaner.

February 26, 2022June 25, 2022 admin

In this life hack I build my own extra long ceiling cleaner. I needed to clean spider webs from my ceiling which are over 20 feet high.

To build the cleaner, I attached a standard cleaner to a board by drilling through both and attaching them with a screw and some velcro strips. Then I attached additional boards with screws to make it even longer. The finished product is about 10 feet long, as shown in the picture below.

Here is how the finished product looked for building the extended ceiling cleaner

More details are in the following video:

Posted in Life Hacks

The Beauty of Binder Clips

January 3, 2022January 16, 2022 admin

In this post I go over some of the many uses of binder clips. I love these versatile items, second only to velcro strips (see more about velcro strips here).

Use 1: Securing trash bags to the trash can. If you have ever had your trash bag collapse in the trash can, you know how annoying this can be. Use binder clips to secure your trash bag to the trash can and this will never happen again.

The trash bag will always stay in place when secured by binder clips, as shown in the photo above.

Use 2: Closing an opened food bag (like a Chip Clip). Once you open a bag of potato chips or something similar you might just fold it, or use a rubber band, or maybe even use something like a chip clip. However, using a binder clip to keep the bag closed works great! And binder clips are much cheaper than a Chip Clip.

Here I am using a binder clip to keep this bag of rice closed (after I have opened it).

Use 3: Hanging up artwork (or other light things). Often I will want to hang up something my kids made in school, but don’t want to tack or nail it up as this will damage the artwork. So instead I use binder clips to hang up the artwork. This has the advantage of not damaging the artwork and it can still be hung up on a nail.

Here is an example of how you can use a binder clip to hang up artwork / kids papers etc. without damaging the artwork or having to put up more nails.

Use 4: Organize cords: Binder clips can be used to organize cords (as shown in the following picture). However, I think using a velcro strip is a better option.

Here is an example of using a binder clip to organize cords.

Here is a video talking more about the beauty of binder clips.

Posted in Life Hacks

Posts navigation

Older posts

Life Hack and DIY Facebook Page

Get more stuff

Subscribe to our mailing list and get interesting stuff and updates to your email inbox.

Thank you for subscribing.

Something went wrong.

We respect your privacy and take protecting it seriously

Proudly powered by WordPress | Theme: x-blog by wpthemespace.com