Skip to content

Life Hack and DIY Lifestyle

  • Things I like
  • Life Hacks
  • DIY projects
  • Home Improvement Basics
  • About Me
  • Resources
  • Lego
  • 3D Printing

3D Printed Carabiner

May 31, 2023June 15, 2023 admin

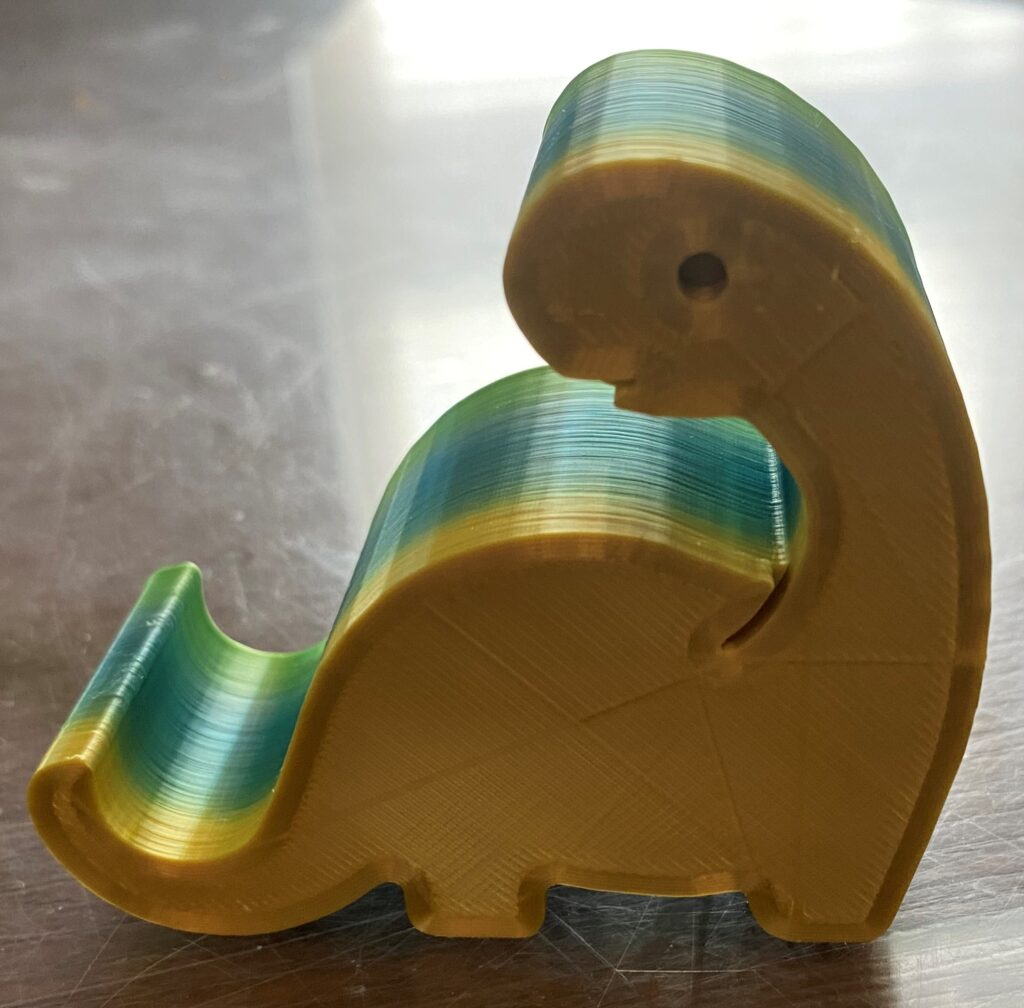
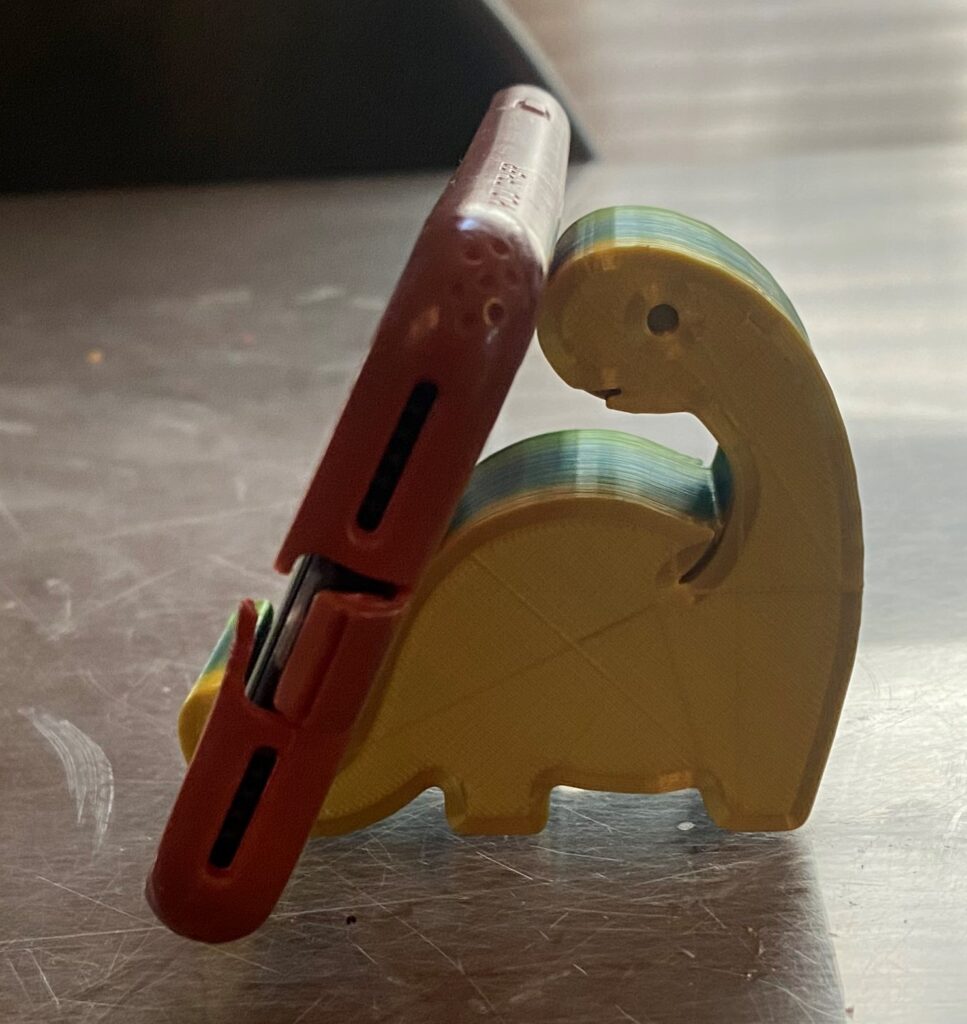
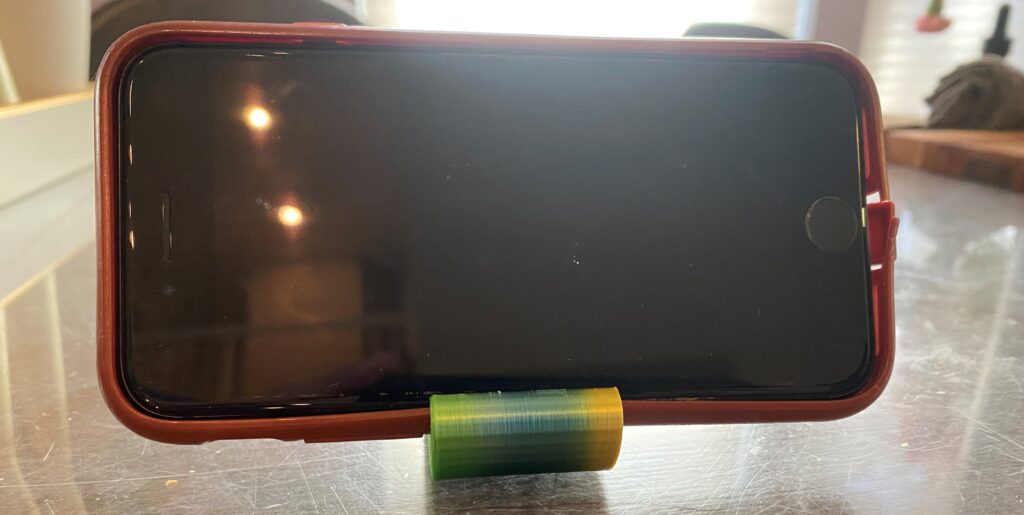
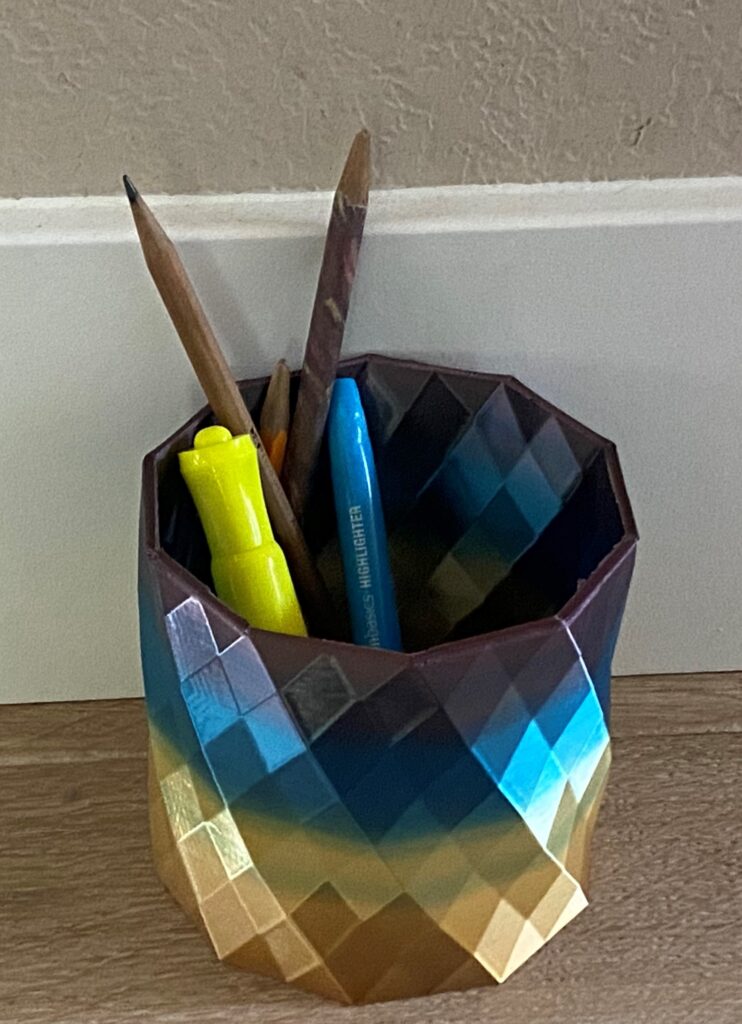
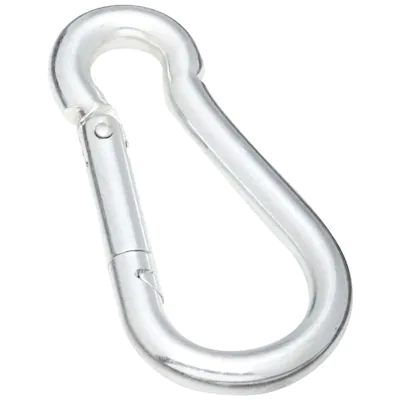
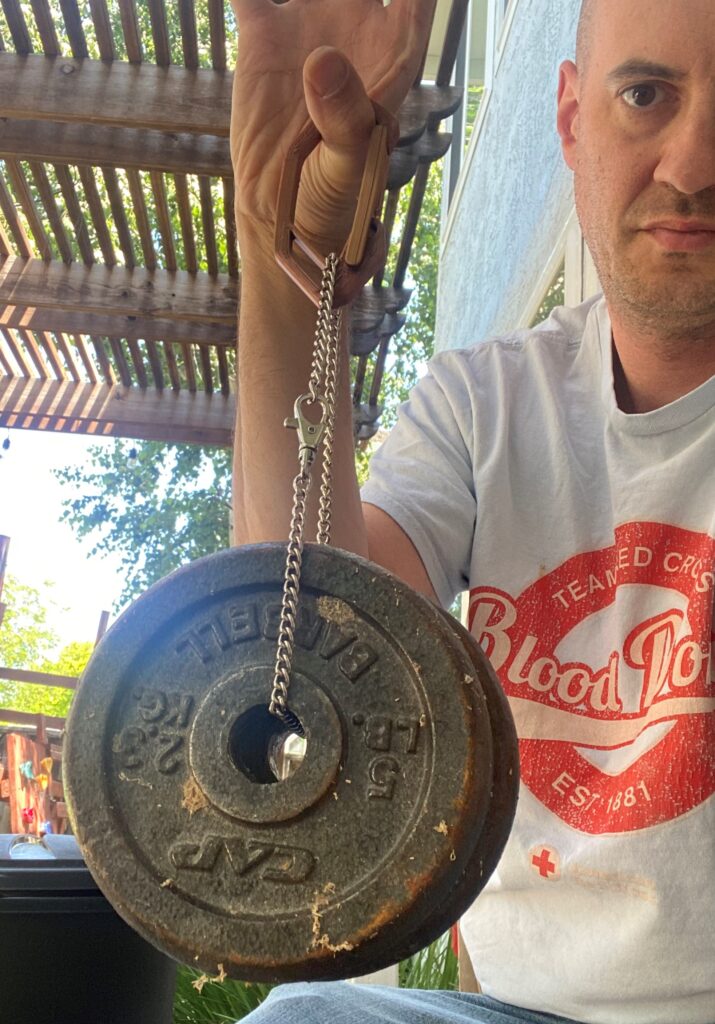
The latest thing I 3D printed was a carabiner. I was skeptical on how strong it would be, but it was able to lift a 10 pound weight no problem. I would definitely use this design again if I needed one. Below is how the carabiner looks and a picture of it supporting 10 pounds.

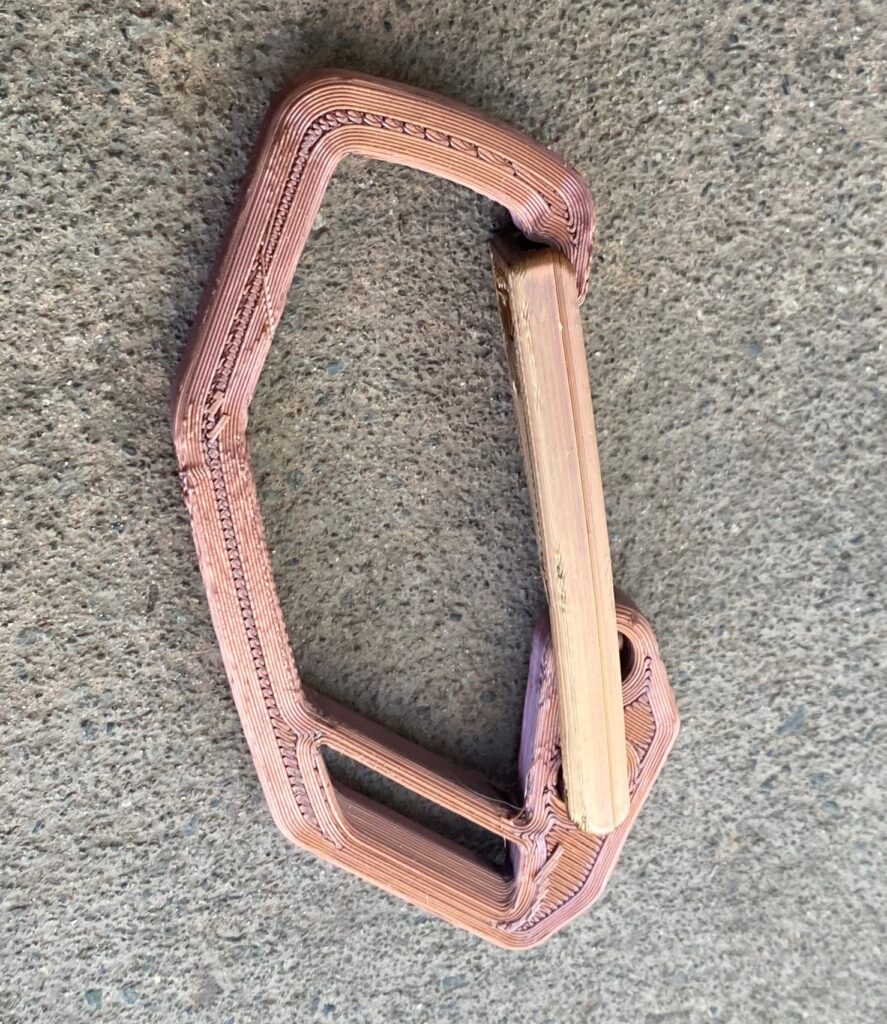
The printing specs were 100% infill, no supports needed. Here is the link to get the code:

https://www.thingiverse.com/thing:489709

You can see more details in the following video:

Posted in 3D Printing

3D printed cell phone stand

May 20, 2023May 20, 2023 admin

This is the latest thing I 3D printed, it is a cell phone stand shaped like a dinosaur. This is how it turned out.

This is the stand without holding a phone.

This is how the cell phone stand looks holding a cell phone.

The cell phone stand is very sturdy and has been very useful. To print it is easy, I used 100% infill (so it would be solid and therefore study) and no supports.

Here is a link to the source files:

https://www.thingiverse.com/thing:2646317

Posted in 3D Printing

Pot / Pencil Holder

May 11, 2023May 12, 2023 admin

This is another print I did recently which turned out really well. It is a pot (with a wide base), which could serve as a pencil holder. When I printed it the setting were 0% infill and no support. I use rainbow PLA , which is why the coloring changes.

Here is the link to the print code:

https://www.thingiverse.com/thing:2844020

Posted in 3D Printing

Pencil holder

March 15, 2023March 15, 2023 admin

I have a lot of pencils around the house so I thought printing a pencil holder would be a good idea. This is the one I printed which I think turned out really well:

The print was pretty easy, it took about 9 hours and I used 0% infill.

Here is the code for the print:

https://www.thingiverse.com/thing:1325680

Posted in 3D Printing

DIY Project- Making a 3D printer spool holder

February 19, 2023February 25, 2023 admin

This is a very simple project where I made my own spool holder for my 3D printer. This is how it turned out:

I have a 3D printer and some times the filament spools are too big to fit the machine. Since they are too big to fit in the machine you have to create a spool holder to hold the filament and allow the filament to be slowly pulled into the machine while printing. I looked on Amazon and found filament holders for about $15 or so.

However, it seems pretty simple so I decided to make one of my own. This required the following steps:

Step 1: I used a flat wide board as the base of the spool holder. I used this board to reduce the likelihood that the spool holder would fall over and overall make the spool holder more safe.

Step 2: Screw in a centered two by four to the flat board. The two by four is just a bit wider than the spool, so it is a good base for the extended boards which will hold the spool.

Step 3: Add the extender boards to the two by four. These boards are long and thin to hold the filament spool.

Step 4: Drill a hole in each extender board big enough to fit the bolt. Place the bolt through one hole, through the filament spool, and then through the hole of the other extended board. Add a nut to keep the bolt in place.

That’s it, you are done!

You can see more details in the following video:

Posted in DIY projects

DIY Project – Outdoor Table Take Two

February 5, 2023February 5, 2023 admin

This is my second take on building an outdoor table. The first attempt worked out fine (see more details here: https://lifehackanddiy.com/diy-project-outdoor-table/) but the table top was made out of fabricated wood and it eventually split due to the elements.

This is how the new table turned out, I think it turned out really well.

This is how the completed table looks.

The basic construction is that I bought a 18 inch wide 8 foot long board and cut it in half, resulting in two boards. I put these boards together to make a 3 foot wide and 4 foot long table.

Below are step by step instructions on how I built the table.

Step 1: I cut a 18 inch wide, 8 foot long board in half. This resulted in a table top of 3 ft by 4 ft. Of course, I had to measure a lot and do some sanding to make it all even.

Step 2: I built a base for the legs. The base was made of two by fours. I connected the legs to the two by fours with torque screws. I wanted to make a base for the legs as the table top was relatively thin and I wanted something more substantial keeping the legs in place.

Here is a shot underneath the table. You can see the legs connected to the two by fours which are then connected to the table top with bolts.

Step 3: I connected the two by fours to the table top with bolts and nuts (two bolts per leg, so four bolts total). The end result is that the table top is smooth except for these four bolts as shown in the picture below:

Here is the table top. You can see how it is two boards put together, and how the top is smooth except for the four bolts which support the legs.

Step 4: I added a trim board all the way around to help keep the table top in place. Before I added this trim the table had the ability to shift out of alignment. With the trim in place this cannot happen.

Step 5: I added two more two by fours, one at each end of the table. This again was to add more stability to the table.

This is a shot of the end of the table. You can see the two by four I added to give the table more stability.

Step 6: I sanded and stained the table. And that was the last step, all done!

Here is a video summarizing this project:

Posted in DIY projects

Life Hack – Making your own garbage can lid

January 28, 2023January 28, 2023 admin

I have a trash can in my backyard which gets really gross when it rains because it doesn’t have a lid. I thought of buying a new trash can with a lid but it seemed like a waste money. So I tried to figure out how to make the lid on my own.

This is the trash can which needs a lid

The solution was pretty simple. I first took an existing lid for a plastic box I already had that was close to the right size. Then to make the lid stay on the can I cut a slit of the lid and a slit on the trash can and tied them together with a velcro strip. Then I spray painted the lid black so it matched the trash can. That was basically it, pretty simple but it saved me from buying a new trash can!

This is the finished result, trash can with a life hacked lid.

Overall a simple but useful life hack. See more details in the following video.

Posted in Life Hacks

Making your own dog fence

November 17, 2022January 16, 2023 admin

I was going to buy a dog fence to fence my dog off from certain areas of my house. However, when I looked on Amazon these fences were $45+ and these were more enclosures than fences. Also these enclosures were 20+ ft long while I only needed a fence for 10 feet or so.

Here is an example of dog fence for sale on Amazon. This is much bigger than that I needed.

Therefore, I decided to make my own dog fence. This is how it ended up looking.

This is how the dog fence turned out. It isn’t pretty but is very functional.

The steps to make the dog fence were very simple. First I cut chicken wire to the desired length. Then to keep the fence stable and able to stand on its own, I added boards at the bottom (held together with a bolt and nut). I also added vertical boards to keep the fence upright. To these I used velcro ties to connect the fence to the vertical boards. And that was it! It was easy and cheap and should last a long time.

You can see more details in the following video:

Posted in Life Hacks

Life Hack – Fixing a broken windshield

September 16, 2022September 16, 2022 admin

We all have have gotten a crack on our windshield due to a rock or similar debris. However, getting the windshield replaced isn’t cheap (usually $500 or more) and if the crack is small it might make more sense to simply fix the crack. The crack doesn’t get fixed so much as sealed so that the crack doesn’t spread. You can pay someone to do this or you to do it yourself rather easily and very inexpensively.

Below are the steps to seal a windshield crack.

The only materials required is the sealant, which can be found on Amazon. I bought the sealant in the picture below for only $3 on Amazon, here is a link to the product on Amazon:

Permatex 81730 Flowable Silicone Windshield and Glass Sealer, 1.5 oz.

Step 1: The first step is to simply the clean the crack of any dirt or debris. This way you don’t seal any unwanted material into the crack. Below is a picture of the crack I am sealing. This is actually the third time I have sealed this crack (which is seven years old). By sealing the crack every few years I have prevented it from expanding.

Here is a picture of the crack I will be sealing.

Step 2: In this step I cover the crack with the sealant. I normally use much more than I need since the excess will end up being scrapped off and the sealant is inexpensive.

Here is the crack covered in sealant.

Step 3: In the next step I squeeze the sealant into the crack to fill any spaces below the surface. For this I took a laminator sheet to push the sealant into the crack. Other materials which could be used for squeezing in the sealant are saran wrap or a trash bag, basically anything to squeeze the sealant into the crack. After squeezing in the sealant leave the sealant alone for 3-4 hours so that the sealant has time to dry.

Here is the sealant forced into the crack.

Step 4: In the final step I remove the laminator sheet and then scrap off the excess with a razor blade. For ease of use and safety reasons I had my razor blade in a razor blade holder when I used it. More details on razor blade holders can be found here: https://lifehackanddiy.com/razor-blade-holder/

Here is the crack with the sealant spread out and dried.

Here is the the remnants of the sealant being removed with a razor blade.

That’s really all there is to it. If you follow these steps you should be able to seal any crack on your windshield, avoiding the need to pay for repairs and pay to have the windshield replaced.

See more details in the following video:

Posted in Life Hacks

DIY Project – Renovating my swing set

September 4, 2022September 5, 2022 admin

In this project I renovated my kid’s swing set so that it could support adults.

This is how the swing set looked before any renovations. Note that it actually had three swings but I had already removed one of the swings before taking this picture.

This is the swing set before any improvements (plus dog)

The idea was to upgrade the swing set so that it could support adults. This required the following upgrades:

1.Replace the swing chains: I wasn’t sure how much weight the current chains could support. Also, the current chains were rusted. So it seemed best to just replace them.

2. Replace the swing (the part you sit on): The set still had the original swings which were meant for little kids. I replaced them with stronger swings I found on Amazon.

3. Strengthen the beam the swings sit on: Previously the swings were held in by a long screw / eye bolt with a hole in it, so all the weight of the rider was on the swing. I didn’t think this would work for an adult that weights 200 pounds. So I added an additional beam on the top of the swing set and had the swing set chain go over this board.

4. Create new swing “tracks”: I created track for the swing chain to go over the support beams so the chain would not move around and damage the wood but would stay in one place.

5. Stabilize the swing set: The swing set had a tendency to wobble (and even slightly come off the ground) when multiple people were on the swings. To prevent this I added more weight to the side of the swing set that didn’t have the platform.

Here are more details on each of these steps:

Step 1: Replace the swing chains: I bought new chains at Lowe’s. They were rated for 500 lbs so they should definitely be strong enough to support an adult. I bought eight foot chains lengths, which were about a dollar a foot.

I also bought chain accessories to connect the chain to itself and to connect the chain to the swing.

To connect the chain to itself I used a “quick link” (At least this is the name it is given on Lowe’s). It is a chain link which was a portion that unscrews. How it works is that you unscrew the link, connect the two pieces of chain, and then re-link them by screwing the quick link closed. To connect the chain to the swing I used what Lowes called a Spring Snap, which is similar to a carabiner.

This is a quick link, which is what I used to connect the chain to itself.
This is a Spring Snap, which is like a carabiner. I used this to connect the chain to the swing.

Step 2: Replace the swing: The original swing set had a swing built for children which I don’t think could support a lot of weight. So I replaced the swings with adult swings which could support my weight which I found on Amazon.

This is the new swing I bought on Amazon, it is rated to support up to 660 pounds.

Step 3: Strengthen the beam the swings sit on: To strengthen this support beam the swings sit on I added a extra board over the top of the swing.

Step 4: Create tracks for the swing: I wanted to create tracks for the swing so that it would always swing in a straight line and the swing would always contact the same portion of wood. To create the track I first drilled hole with a spade bit. The goal was for the swing chain to go through these holes. Then I put a track of rubber down on the area where the swing chain would contact the wood. This way the swing would not damage the wood as it swung, but would instead put pressure on rubber, which hopefully could take the weight. The rubber I used to make the track for the chain is actually meant to be used on the bottom of garage doors. I bought it on Amazon, you can see details in the picture below.

This is how the rubber looks like I used to make the track for the chain.

I had the chain go over the rubber and through the holes I drilled to keep the chain in place. This is how the final product looked. You can see the drilled holes and the chain going through, which is supported by the rubber.

Step 5: Stabilize the swing set: As I mentioned before, when the swing set had multiple people on it the swing set would shift and parts of it would even come off the ground. To make it more stable I bought four cinder blocks which weighed 40-45 pounds each. They also only cost $5 each. Next I put a chain through the cinder blocks and attached the same chain to the swing set. This is how it looked in the end:

Here are the cinder blocks I chained to the swing set to give it more stability.

This was the final step. After this I was done. It was a decent amount of work but it turned out pretty well. See more details in the following video:

Posted in DIY projects, Uncategorized

Posts navigation

Older posts
Newer posts

Life Hack and DIY Facebook Page

Get more stuff

Subscribe to our mailing list and get interesting stuff and updates to your email inbox.

Thank you for subscribing.

Something went wrong.

We respect your privacy and take protecting it seriously

Proudly powered by WordPress | Theme: x-blog by wpthemespace.com